Meats and Sausages
Building Your Own Barbecue

The simplest barbecue is a screen placed on two rocks. A fish on a wooden stick can be placed over an open fire, and such a set up may also be considered barbecue. Cooking with an open fire is normally accomplished with spits or by placing meats on grill screens.

The horizontal spit is a metal shaft like a big skewer onto which the meat is inserted. The meat is turned around above the hot coals until it is cooked. When the horizontal spit is turned around it becomes the simplest form of the modern rotisserie. This can be accomplished by attaching a handle or a motor to the spit rod. The end of a spit bar can be heated and bent to form a handle. A practical solution is to use two sections of pipe as support bearings.
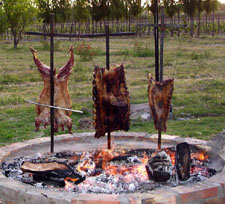
Although we normally think of spits as horizontal units, they can be vertical as well, known as Argentinian asado spits. Asado spits are used to hold large pieces of meat such as whole lambs, goats, or even cows. Argentinians have perfected spit barbecuing over open fires for centuries and the sight of 100 animals barbecued at the same time is simply breathtaking.
It will be futile to construct a gas-powered grill at home as commercial units are well made in factories and carry reasonable prices. Thus the discussion is limited to building wood or charcoal burning units. If a lot of heat is produced these units work in a grilling mode, when low heat is applied they can cook meats for a long time in true barbecue mode.
Barbecuing one chicken and a few sausages can be easily accomplished with a few pounds of charcoal and may be accomplished with one load only. Charcoal briquettes will last about 30-45 minutes and more briquettes will have to be added when barbecuing for a number of hours. Our discussion is limited to the real slow-burning barbecue which continues for a period of time and requires a steady supply of hot coals or charcoal briquettes.
There are a number of threaded pipe connections available in any plumbing department. They are made of steel, come in different lengths and diameters, and can save a lot of time and money.
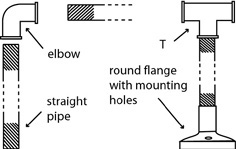

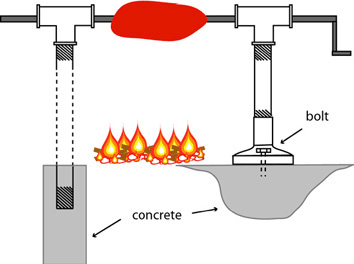
A spit like the one shown above can be embedded in the ground or attached to the top of the masonry barbecue. It may be made portable by attaching it to a heavy metal plate and placing it on top of the masonry barbecue.
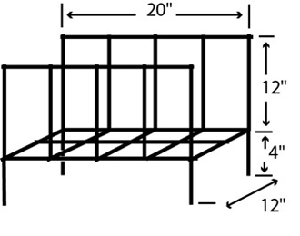
Solid wood logs must be pre-burned, and an iron wood holding box can be made from 1/2" metal rebars. Simple weld tacks will hold it together. The unit should be placed on the fire pit side. The box is loaded with wood logs, and as they burn they get smaller. When they become hot coals they will fall through the bottom of the grate and can be moved over to the fire pit.
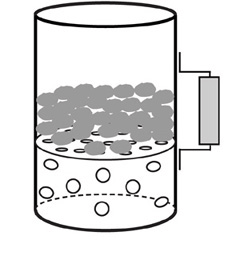
Charcoal briquettes should be pre-burned until covered with whitish ash. Otherwise, meats may acquire a lighter fluid flavor. A simple starter can be made from a large metal can by removing the top and the bottom. Fresh charcoal is placed on a perforated plate, then a paper is ignited below. There are holes made on the outside in the lower part of the can for supplying air. The unit can be placed on hot coals too. When ready, the pre-burned briquettes are delivered to the fire pit. Another method to light charcoal is to use an electrical wire starter. Regardless of the type of charcoal starter used, the combustion of briquettes will greatly benefit by having an air space below. This will supply air from below and charcoal briquettes will burn easier.
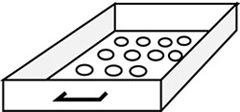
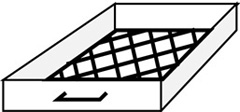
Charcoal holding pans may be used for pre-burning briquettes. Having a set of two pans, we are assured of a steady supply of hot briquettes.
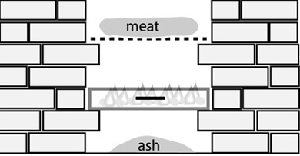
The advantage of this arrangement is that the ash removal is independent of the supplying new coals procedure.
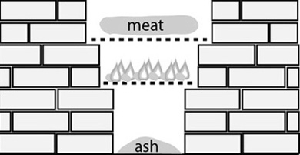
Screen supports
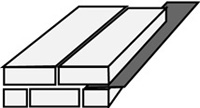
Screen supports can be made by inserting a flat sheet of steel (or pieces) into fresh mortar.
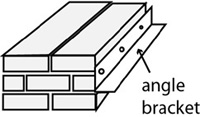
Attaching bracket with screws either into fresh mortar or drilling into the brick.
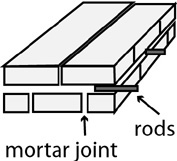
Inserting round rods or construction rebars into the mortar.
Keep in mind that firebrick mortar joints are 1/8" or thinner and that puts a limit on the thickness of a support that can be used. If you plan on burning wood inside use firebricks as the temperatures can be very high. The unit will be standing outside and it will be exposed to sudden changes of temperature. Different materials, such as stone, brick, firebrick, or metal, expand at different rates when high heat is generated, so the firebox may weaken. The best practice is to line the firebox interior with firebricks to protect the outside stonework or masonry from direct exposure to high temperatures.
Firebricks
There are different classes of firebricks that are classified according to heat resistance. The firebrick generally used for building fireboxes has a melting point of around 2,905° F (1596° C) and its maximum expansion is one-sixteenth inch per foot at a temperature of around 2,200° F (1204° C). Concrete can withstand temperatures of 1000° F (537° C), but it should be noted that the temperatures in the stove or fireplace fall into 800-1500° F (426-815° C) range.
It is of no importance whether firebricks are laid on its natural bed, side, or standing up. What is important is that a fire-clay mortar is applied when joining bricks. The mortar joints are much thinner (less than 1/8") when laying firebricks. The reason for such thin joints is that fire clay used in mortar joints is not as resistant to heat as the firebrick itself. The 1/4" or thicker joints have a tendency to shrink and cause damage to the joint. A common brick mortar will not withstand high heat because it contains lime, which fluxes under heat, and sand, which does not possess such heat-resisting qualities that are required in these joints.
A properly mixed fire-clay mortar is available from lumber or brick supply stores.If only powdered fire clay is available, it should be mixed with about 20-25% Portland cement and the joints should be less than 1/8" thick. Once when the firebricks are laid, they should be submitted to intense heat for about 5 hours. This would create a solid and permanent bond. There should not be any space between firebricks and the regular bricks or stonework. The joints must be completely grouted and sealed at the top to prevent any water from entering. In some high heat-producing units, an air space, between firebricks and the regular bricks is provided. This gap is usually filled with mineral wool or other suitable thermal insulators. It is recommended to build the floor of the firebox with firebricks as well.
There is a special material rated at 3000° F (1600° C) used for making forges. You can cast the entire refractory liner for a forge or just the floor using this material. This specialized cement known as castable refractory consists of calcium aluminate cement, also known as fondue cement or lumnite, and sand with crushed firebrick.
Firebox
A firebox can be constructed from a heavy gauge sheet iron with a grate and doors attached. If such a unit will be covered with bricks or stonework, it must be noted that steel expands much more than firebrick.
The top of the fire pit may consist of a solid plate. Besides providing better draft and confining heat, the plate can be used as a stove base for cooking pots. This will keep them away from smudging on the outside. Such a plate should be at least 3/8" thick; otherwise, it may warp and sag in. If a thinner plate is used it should be reinforced with angle brackets. The easiest solution is to have a removable plate. If a permanent plate is installed, some clearance shall be provided for the expansion of the points where the plate is attached to the masonry.
A fire pit can be an open fire type, a tight firebox with a door and a damper, or an open type covered with a metal plate. The plate can be removable or can be attached to the masonry or stonework with hinges. This plate gets very hot and is used sometimes for camp cooking. As metal expands faster than masonry, in order to secure permanent and lasting installation, a provision for expansion should be included in the design.
Rotating plate covering barbecue
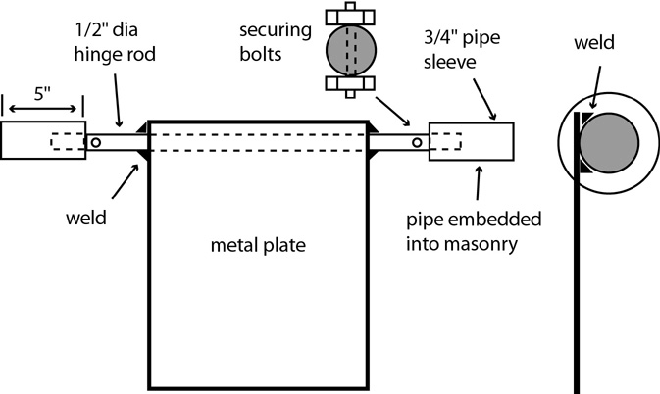
The metal plate and hinge rod will expand due to heat. There is a space inside the pipe sleeve for this expansion but the pipe sleeve itself will not expand. As a result there will not be damage to the masonry even after many hours of operation. The design comes from the 1936 book "Camp Stoves And Fireplaces" published by the Forest Service, United Stated Department of Agriculture.
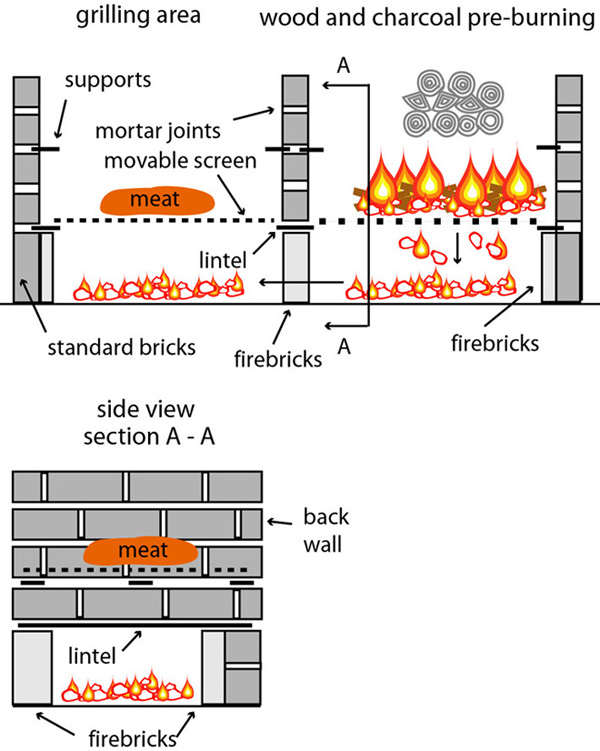
An easy to operate barbecue. Hot coals or pre-burned charcoal briquettes are moved towards the grilling area. If barbecuing for many hours, it is recommended to install front and top covers, with a provision for an exhaust vent. It shall be noted that firebrick mortar joints are very thin, 1/8" or less. This does not leave enough room for placing a round rebar between them. Increasing the size of a joint will weaken it and it may break in time. Making supports from 1/8" flat steel is a better idea. Installing any kind of metal that gets heated to high temperatures directly into masonry or stonework is a poor choice because metal will expand. This will create damage to a brick or a stone.
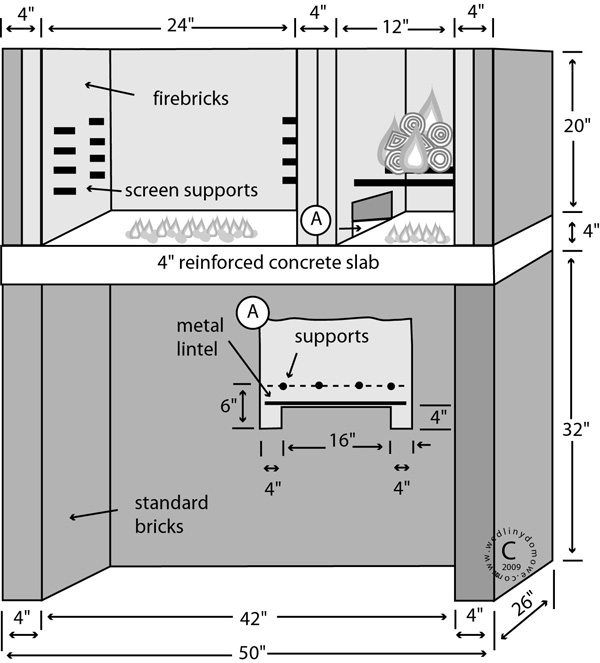
Depicted above is a hot coals-producing firebox which makes the unit friendlier to operate. As the logs burn they become smaller and fall down through the grate. Then, they are pushed over to the left through the 16 x 4" opening in the side wall. The same system can be employed for pre-burning charcoal coals. It is possible to eliminate the "A" dividing wall. Two supporting rebars could run from wall to wall (42") and support removable screens.If angle brackets are used for making a V-channel screen the rear support rebar should be installed slightly higher to facilitate the flow of grease toward the front. The aluminum collector can be attached to the screen to catch grease. To confine heat inside a top cover can be installed. The area below the slab can be used for storage or a propane tank can be placed there.
It is recommended to line the walls with firebrick for areas subjected to high temperatures. The floor of the unit and the reinforced concrete slab can withstand high temperatures. The concrete slab can extend to the left, right, or both, to create extra working areas. The support rebars should be placed into the mortar between the bricks.
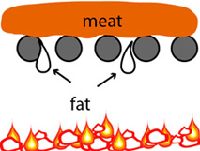
Round bar screen.
Almost all factory made units employ screens made out of round bars. This does little to prevent grease from dripping down on hot coals. This in turn induces flares.
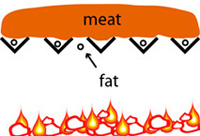
V-channel screen.
Argentinian grills use angle brackets which are very effective in removing accumulating fat. The screens are slightly raised towards the back to provide an easy path for the grease to flow. This fat is mixed with meat juices and is discarded or collected for making sauces.
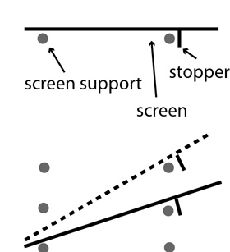
Screen adjustment.
By careful arrangement of supporting brackets/rebars, the screen can be placed at different angles. This helps to control heat. A steak can be seared on each side at the lowest screen setting. It is then placed higher to be cooked at lower heat. When done, it may be moved even higher and it will just be kept warm.
In many commercial establishments grill screens are suspended in the air by attaching them to adjustable chains. This is especially visible in Spanish speaking countries such as Argentina, Uruguay, Chile, Mexico, and Brazil. A manually operated crank handle lifts up the screen to the desired height. To bring it down a pin is pulled which disengages the pawl in the ratchet gear. This allows the gear to turn the other way bringing the screen down. V-shaped channels are the norm and to facilitate fat flowing to the collector, the screen must have a little tilt. It is easily accomplished by placing more meat in front of the screen. The screen can not tilt too much as it is attached to the rings which ride on support rods.
A simple arrangement for raising or lowering grid:
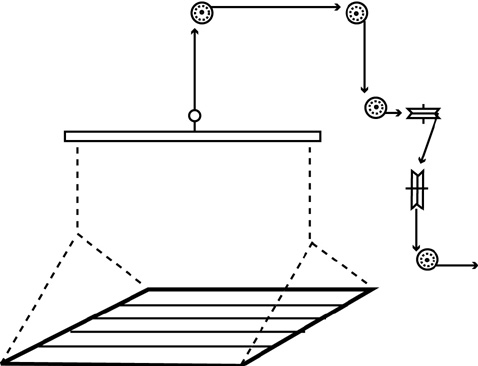
A pulley is a versatile device and allows for easy change of direction. In the above design a proper balance will be obtained by careful arrangement of meat pieces. Attaching a separate pulley to each side of the grill will help with stability.
A better commercial design:
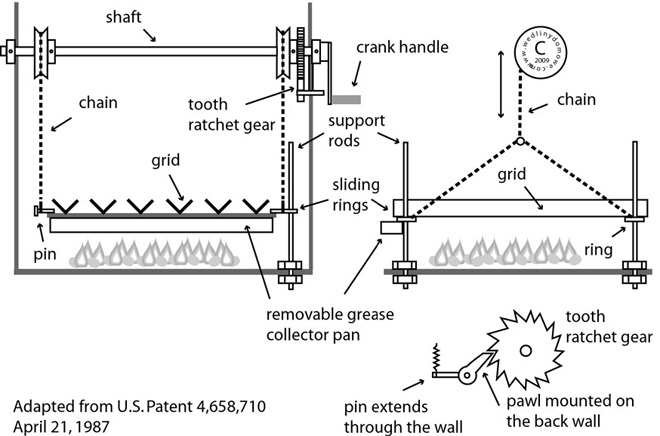
This design offers great flexibility: it may be part of a movable barbecue or it may become a part of a masonry unit. The bottom plate can be eliminated and the sides may be secured to the permanent structure. In any case the unit should be lined with fire bricks on the inside.

