Meats and Sausages
Metal Sheet Smoker
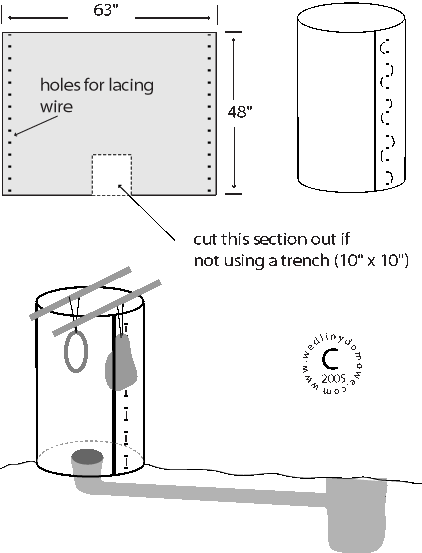
A fully functional barrel smoker can be made from a thin sheet of metal and can be carried anywhere. About 22” (56 cm) in diameter and 48” (122 cm) high are acceptable dimensions. We want it to be on the high side as it will be embedded 1-2” into the ground and will not have any baffles that, under normal conditions would separate the fire pit from hanging meats.
Just rudimentary math skills are needed to come up with the most practical size of the smoker and an example is provided below of the necessary calculations and steps needed to build this smoker. First, we have to determine the length of the top side of the metal sheet to create a 22” diameter barrel.
- The length L = P x d
- Where P is the math constant =3.14 and d = diameter
- That gives us L = 3.14 x 22 = 69.08 = 69 inches
We are going to add an extra 1” (2.5 cm) to this length as the ends of the sheet have to overlap to prevent the leakage of smoke. The diameter of the barrel is now 22” (56 cm) and a standard 20” (51 cm) screen will fit inside without any trouble. The screen can be used to hold fragile pieces of fish like fillets or can be covered with gravel (stones) to become a fully functional baffle.
Some wooden sticks have to be collected, a wonderful task and introduction to the art of smoking for the kids running around. They have to be longer than the diameter of the barrel (22”) and about 1” thick. Those will become our smoke sticks on which we’ll hang the meat and it does not make any difference if they are not perfectly straight. A flat sheet of cardboard will rest on them and they establish the amount of clearance for the smoke to get out. A burlap sack will work, too.
Secure two sheets together to drill or punch out in them the series of little holes, about 3/16” (5 mm) diameter, and every 2” (5cm). A small diameter wire (without insulation) will be sneaked through them (like lacing a shoe) to hold the two sides of the sheet together. You can use a few small bolts and nuts too.

Metal sheet smoker
As this basically is a simplified version of a barrel smoker, a decision has to be made on the type of fire pit that will be employed. That step is dependent on the terrain where a smoker will be placed. If it’s hilly and stony, gather rocks and build a loosely compiled base support. If it’s flat and grassy, dig a trench and you will have a much better smoker.
A hole for a fire pit has to be dug, about 2’ (61 cm) deep and 2’square.The 4’ long, 8” wide by 8” deep trench should be deeper on the fire pit end. If possible, try to find a grassy area for the location of the trench and before you start digging, score the grass with a flat shovel (about 4” deep, 10 cm) the outline of the trench. What you need is entire sheets of sod, like the ones we buy for our garden, as after the trench is dug, those big grassy plugs will be replaced on top of the trench.
The length of 4’ is all we need, and after the trench canal is made, it should be densely covered with wooden sticks, exactly as a trap for wild game animals. The sheets of grass can now be repositioned over the trench and our smoker is almost completed. Now the barrel can be twisted in opposite directions a few times and firmly embedded into the ground right over the outlet side of the trench.
We have just designed a fully functional smoker, a smoker that can do a wonderful job for as long as our vacation lasts and the only parts that we bring back home are the metal sheets and the screens. And as we always say: as long as you see the smoke your smoker is working fine, looks don’t matter, and neither does the price that you paid for it. The quality of the final product depends on the sausagemaker’s knowledge and he holds the key.
Notes
A very practical solution is to carry one or two stainless screens when going camping. This design revolves around a round grill screen, one made of stainless steel and commonly sold in all large department stores. The screen can be placed on rocks and used as a grill to satisfy the first hunger and then will become a crucial part of the smoker. The gravel or little stones can be found everywhere and placing them on the screen will create a fully operational and practical baffle.
Or two screens can be employed, one as a baffle and another to hold the meat. What can be better to use outdoors as a spacer to separate the screens than an empty soda can? Three cans spaced at 120 degrees make wonderful spacers. Of course, we don’t need any screens or baffles when digging a simple trench to deliver smoke.


