Meats and Sausages

Formed Ham
Formed ham is made up of many individual meat cuts. When we purchase ready-to-eat ham, we assume that it comes from whole meat. This is due to our familiarity with images of countryside hams hanging from the hooks or large hams lying in supermarket displays. This assumption is correct as traditionally made hams were, after all, the rear leg of a hog. This preconceived opinion is then applied to a boiled ham which looks as if it were carved from a solid piece of meat. Although most one-piece hams are smoked and then water-cooked, they can be easily recognized by their characteristic shape. Yet the rectangular or oval-shaped hams and individually sliced and packed ham packages do not come from one leg of the hog. They come from different animal parts, for example, from the front and the rear legs or from different animals all together. In addition to hams, other products, such as turkey or beef rolls may be produced. By choosing different shapes forming molds, products can be made in the shape of pork chops, ham steaks, and others.
The difference in flavor between a commercially produced formed ham and a formed ham made at home is significant. The home made ham has a wonderful aroma that is easily noticed. It also has a strong meaty flavor as it was not injected and diluted with water. The slices of home made ham keep on losing moisture in the refrigerator and become drier. The slices of commercial-made ham or other meat products feel wet when removed from the package. They become more slimy as time goes by due to the curing solution that is losing its holding power and beginning to leak out. The meat has no reason to feel slimy when held under refrigeration as there is only about 40% humidity present. Such meat will start drying out, even when kept in a container.
Manufacturing Process
To produce a formed ham from individual meat cuts, the following must be observed:
- There must not be any fat on surfaces that are in contact with each other.
- All membranes or silver skin must be removed from each muscle or at least cut with a knife.
- If those rules are not followed the final product will exhibit gaps and air pockets and will not hold its shape when sliced.
Production of formed hams or blocks of meat follows similar steps that are employed for making sausages:
- Meat selection
- Cutting
- Curing and Color
- Tumbling
- Stuffing and Pressing
- Cooking
- Cooling
Meat Selection
Lean meat contains more protein, so selecting lean cuts will result in a stronger binding. A formed ham is a lean cut of meat because the butcher removes the lean whole muscles and puts them aside. Those cuts may come from a rear leg (ham), front leg and shoulder, neck, and loin area. The fat, not having protein, is not needed as it will lower the binding properties of the meat. The meat cuts must be sorted by color; otherwise, the final appearance will not be one of intact muscle.
Exudate
The process of making formed products looks easy but there is more to it. First of all, the individual meat cuts must stick together and when cooked, retain the shape of the mold without having any holes inside. This is accomplished by producing sticky exudate on the surface of meat pieces. Think of it as the glue that binds the individual meat cuts together upon heating. The exudate is formed when the muscle’s cell structure is disrupted, which releases a protein called myosin. This protein is dissolved in salt and combines with meat's moisture. The result is a sticky exudate that acts like glue and holds meat pieces together. The disruption of the muscle structure is accomplished by a physical action such as cutting and then applying physical forces to press meat pieces together. Using mechanical action by itself will tenderize the meat but will not produce enough exudate. Adding around 3% of salt results in optimal protein extraction; however, to most processed meats the salt is added at 2%. Salt makes the cells swell and some proteins are released when the meat is cut. In order to produce even more exudate, more proteins must be released which is accomplished by adding 0.3-0.5% phosphates. Phosphates, although much more effective than salt in protein extraction, their effectiveness hugely increases when they are combined with salt.
Commercially produced meats are pumped with a solution containing salt, sodium nitrite, phosphates, and color enhancers. If the meat is pumped with over 25% of the green weight (original) weight) the meat protein solution will be weaker and the binding strength will decrease. There is a limit to how much water can be held by phosphates and the excess will be lost during cooking.
Cutting
The most efficient protein extraction is obtained at 36-38° F (2-4° C) working temperature. To develop strong binding, the surface of the meat must be cleanly cut. This can be obtained when the knife is sharp and the meat is cold or partially frozen. To bring exudate to the surface we have to eliminate unnecessary obstacles such as sinews, external fat, skin, membranes, and silver skin. Now, those prepared meat cuts can be cured.
Curing and Color
Curing meat is a large topic and is covered in detail in Curing Meat
A customer expects ham to have a red color, and it is unlikely that he will purchase a grey ham. To have this red color, meat must be cured with sodium nitrite, which is an ingredient of Cure #1. Curing, in addition, develops in meat "curing flavor" which is highly desired in all quality smoked products, especially ham. As the development of curing flavor requires some time, commercially produced meats, hams included, lack "curing flavor", because, in order to save money, they employ an "accelerated curing" method that lasts less than a day. Since in-home production meats for ham are cured for 3-5 days, the ham would develop its own curing flavor, that can be smelled before the first bite.
Tumbling
Grouping meats of similar diameter for the tumbler will result in a more uniform distribution of a curing solution and better protein extraction. To release more proteins, salt and phosphates are injected into the meat prior to tumbling. It has been observed that after tumbling meat becomes paler, most likely due to oxygen reacting with meat structure during mechanical action. This effect is largely decreased when a vacuum tumbler is employed as there is no air to react with meat. Foaming of the exudate on the surface of meat is also eliminated. Although holding meats for a few hours at room temperature will definitely help with curing color, such a procedure can not be employed in commercial production as it leads to the growth of bacteria and, subsequently, to a decreased shelf life of the product. To make up for insufficient curing time ascorbic acid (vitamin C) is added to the curing solution. Ascorbic acid forces sodium nitrite into producing more nitric oxide, which in turn reacts with myoglobin which is always present, although in different amounts in meat. This results in a strong red color which will be permanently secured by cooking.
A commercial producer will place pumped meat in a tumbler and salt equalization will be performed inside of the machine. Meats are usually tumbled in two ways:
- 10 minutes “on” and 50 minutes “off” for each hour tumbled. Depending on the size of the ham it can take from 8-24 hours.
- 3 continuous hours, then let hams rest in the tumbler overnight. The next day the ham is tumbled for an additional 30 minutes before stuffing.
Those times are not set in stone, and often hams are continuously tumbled for one hour and then submitted to thermal treatment. Such a ham can be manufactured in one single day.
Stuffing and Pressing
Individual meat cuts are then stuffed rather loosely into a cook-in bag and the bag is sealed. If the meats were stuffed firmly, the bag may not conform to the shape of the mold. Then the bag is placed into a mold of a chosen shape. The meat cuts must be pressed against each other with some force, which is accomplished by adjusting the pressure of the top cover. The meat cuts may also be stuffed into a large fibrous casing. They should be stuffed rather loosely as the casing is often placed inside of a press to develop an oval-shaped ham. Those presses are then cooked in hot water.
Ham Press
Ham press.
Ham press.
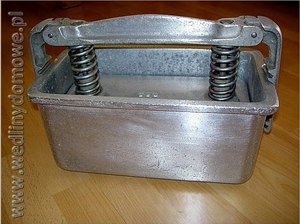
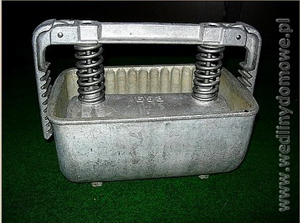
A popular ham press
1 - container, 2- top cover, 3 -locking teeth, 4 - retaining rim, 5 - rod-like guide , 6 - spring, 7 - securing arm, 8 - compression arm (strut), 9 - adjustable nut.
Operation of a ham press
A ham press consists of container 1 and a top cover 2, which can be forced into container 1 to compress the meat. The top of the container has a retaining rim 4. A compression handle 8, which consists of a strut (handle) 8, compression springs 6, and the securing arm 7, engages the retaining rim 4 and forces container 1 and cover 2 together compressing the ham. Strut 8 is penetrated by two upright rod guides 5, such as with adjustable nuts or screws, attached to cover 2 and enclosed in adjustable tension compression springs 6 that rest against cover 2 and below strut 8. At each end of strut 8 securing arm 7 pivots toward and away from container 1.
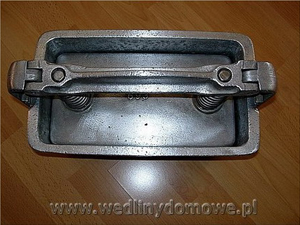
The edge of securing arm 7 that faces container 1 has teeth 3 that engage below the retaining rim 4 of container 1. Pressure on strut 8 compresses the springs 6 and forces the cover 2 into the container 1. At the same time, teeth 3 on the securing arm 7 engage the retaining rim 4. When the pressure on strut 8 is released, cover 2 is retained in the position in which it is by the particular tooth 3 on each security arm 7 which engages below the retaining rim 4. This engaged position is also ensured by the tension on the compression springs 6. Since the tension on compression springs 6 also forces cover 2 deeper into container 1, as the ham shrinks during the boiling process, the ham is always firmly compressed even as it shrinks. The securing arms 7 remain in the engaged position while springs 6 force cover 2 down.
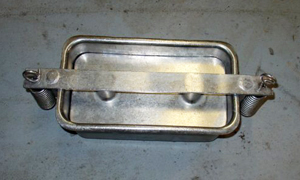
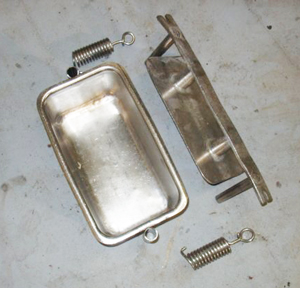
Ham press spring design, Photo courtesy Greg.
Ham press spring design, Photo courtesy Greg.
Ham press spring design, Photo courtesy Greg.
Ham press spring design, Photo courtesy Greg.
Home Made Ham Presses
There is a great variety of home made presses, and they all work very well. In many cases people don’t use a ham press at all, and they use a big waterproof casing. The simplest design we have seen is a tall stainless steel cylinder with a wooden cover and a large stone used as a weight. Such long pots are known as stainless steel vegetable insets and are distributed by restaurant equipment suppliers. The same companies also sell different kinds of rectangular steam table pans which can be easily adapted for making ham presses.
The simplest yet fully functional ham press.
A simple adjustable pressure ham press. This is a different arrangement of the above mentioned method. A rubber band made from the inner tube tire provides pressure against a glass jar or a solid block of wood. A bungee cord will work too. Note: the water level in a cooking pot remains below the top of a ham press.
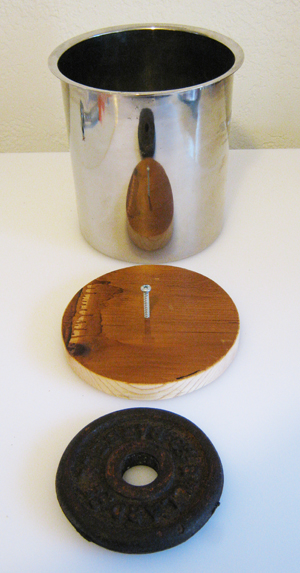
The simplest set up. Stainless steel cylinder, wooden cover and weight.

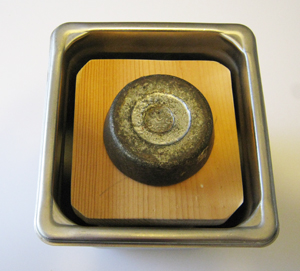
Cylinder with meat inside ready for cooking.
The same design using a rectangular steel pan.
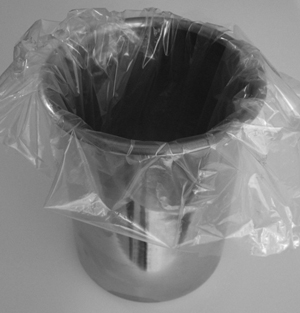
Place Reynolds® plastic cooking bag inside of the 5” diameter stainless steel cylinder. It will help to remove the cooked ham. Insert meat pieces and pack them tightly. Flip over the top of the bag and cover the meat. Place the wooden cover on top of the meat and place a 2 lb. weight on it.
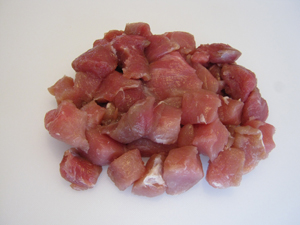
Cured meat pieces are red and sticky due to the exudate (protein extraction) that has formed on the surface. This will help to bind meat pieces together.
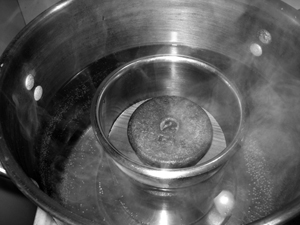
A cylinder with meat inside is placed in the water-filled cooking vessel. The water level remains below the top edge of the cylinder. The weight is on top of the wooden cover. Meat cooked for 90 minutes at 194° F (90° C). After cooking the cylinder is placed in tap water to cool and then placed overnight in a refrigerator. Then, the bag is pulled from the cylinder and the ham is removed.
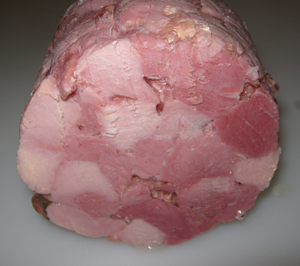
Cooked ham. Lighter pieces are from the pork loin which exercises very little. It needs less oxygen and contains less myoglobin (oxygen carrier).That is why it is lighter in color. Darker pieces are from the leg (picnic) which exercises a lot and needs more oxygen. This results in a higher content of myoglobin and a stronger curing color.
The removal of cold ham will be difficult if a cooking bag is not used and the meat is packed directly in a cylinder. The gel will stick to the walls and the ham will not slide out. The remedy is to insert the cylinder for 30 seconds back into boiling water to melt down the gel.
There are adjustable pressure cheese presses that follow a clever but simple design. Cheese presses are not submitted to cooking temperatures, and the cylinder is made from commonly available pvc. The pipe has no bottom in order for the water to drain away. Some designs use a cylinder with tiny holes just above the bottom.
A cylinder employed in a ham press is made from metal in order to efficiently conduct heat from water into the meat. Construction is very simple and all materials are available in any hardware store.
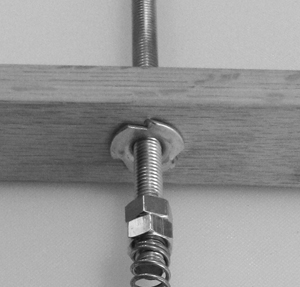
Meat press. Any kind of wrench will apply pressure to a spring.
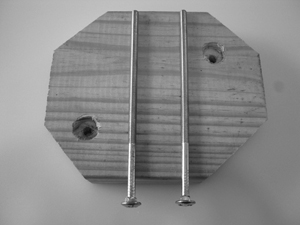
Base and ¼” carriage bolts. The length of the bolts depends on the height of the cylinder.
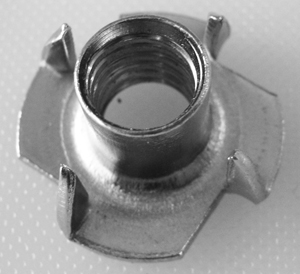
The crucial element of the assembly is the threaded T-nut. Fortunately, it is available everywhere and is very inexpensive.
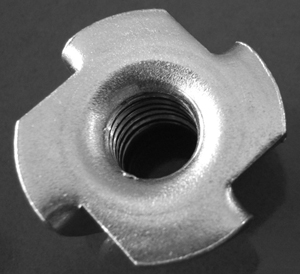
Threaded ⅜” T-nut. The nut allows the ⅜” threaded center rod to move up and down and to apply pressure to the spring.
The nut, the center rod, the spring and the holding bar.
The nut has protruding spikes allowing it to be embedded in the bottom of the cylinder holding bar. The wooden bar rides on carriage bolts and is secured with wing nuts.
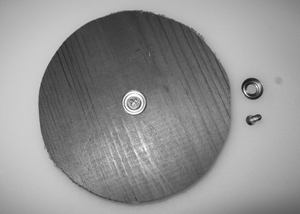
#10 finishing washer is attached with a screw to the top of the meat cover and becomes a receiving base for the compression spring.
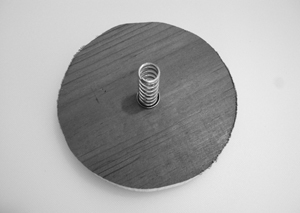
#10 finishing washer supports and holds the compression spring.
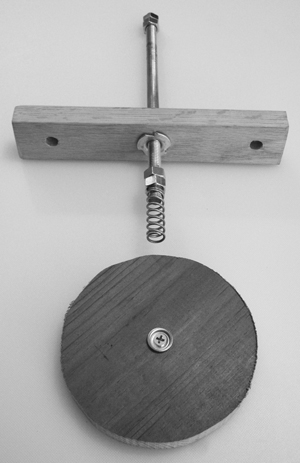
The compression spring fits over the bottom of the center rod and its play can be adjusted by two nuts above. The nut fits snugly over the rod and stays there.
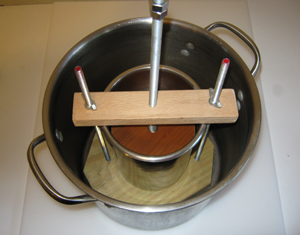
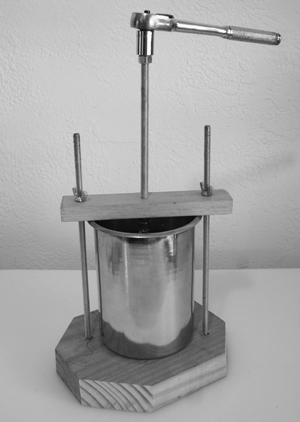
Ham press based on a cheese press design. The press is inside of the cooking pot.
Cooking
The mold with the ham inside is placed in hot water (176-180º F, 80-82º C) and cooked until the meat reaches an internal temperature of 155-160° F (68-72° C). The higher the temperature, the shorter the cooking period. In order to destroy any trichinae that might be present, a ham should be cooked to at least 137º F ( 58.3º C), but such a ham is not considered very palatable. A temperature of 148-160º F (65-72º C) produces a product with better flavor and texture. The length of cooking time is based on the weight of the hams and 30 minutes per pound of meat is an average.
You can not smoke formed ham as the meat is inside a metal ham press. Besides, to facilitate the removal, meat is usually packed into a plastic bag.
Cooling
The mold (press) is taken out (meat remains inside) and is cooled down. Then it goes into a cooler overnight. The next day, the mold is opened and the ham is removed. The ham permanently retains the shape of the mold it was in.Gelatin
You may have some fatty cuts where depending on exudate to bind pieces together may be questionable. Well, a simple solution is to sprinkle meats with commercial gelatin that is available in every supermarket. The second choice is to save some of the connective tissues, such as sinews, external fat, skin, membranes, and silver skin (film) that were obtained during the preparation of meat cuts. They should be cured like other meats, but separately. Then, they are finely minced or emulsified in a food processor, adding a small amount of water until a final paste (emulsion) is obtained. About 5% can be mixed with other meat cuts. Adding more will lower the quality of the ham. Those connective tissues, upon heating, become liquid gelatine that will solidify upon cooling and will hold meat cuts together. This is a common procedure when making top-quality sausages where up to 10% of this emulsion is added.
The Gel. When you cook any meat some of the fat and meat juices come out and are lost. In a frying pan, this substance accumulates on the bottom and many people use it for making gravy. Since formed meat products are cooked in a sealed container, these juices have nowhere to go, and when cooled they become a “gel.” This gel is nothing else but the best that a ham can offer. For many years, canned meat products contained the gel inside. Some people loved it, others hated it, some children cried at the site of this gluey substance. Since 2001, in commercial products potato starch has been added as an absorbent material to prevent the formation of gel. You still eat the gel but it can not be seen now. So if your child objects to eating this delicious gel, just scrape it off.
Luncheon Meats
Luncheon meats are finely ground meats that are usually cured and canned. They can be made at home following the technology for making formed meat products. This means that the meat is ground, cured, stuffed into the mold and cooked. The best example of a canned luncheon meat is American made SPAM® which became famous in 1937. The name SPAM is an acronym for “spiced ham” or “S-houlder P-ork h-AM.”