Meats and Sausages

Ham
The ham has certainly evolved a long way. Traditionally associated with a cut from a hog’s hind leg, a ham is made today in different shapes from a variety of meats such as pork, beef, turkey, or chicken. There are bone-in hams, boneless hams, re-formed hams, dry hams, smoked hams, baked hams, and hams cooked in water. A ham used to be one of the most valuable products, a cut with its own character and distinct flavor. Such a ham was made from a whole leg and was cured in brine or salted and dried in the air. The brining method was too slow and has been replaced by the combination of meat pumping and tumbling, although it is still practiced in home production. The method of making dry hams has basically remained the same with the exception of drying, which is performed in climate-controlled chambers today.
Ham Types
- Dry hams - smoked or not smoked but usually not cooked.
- Whole hams - partially or fully cooked. May be smoked or not. A bone-in ham can consist of a whole leg, half leg, or just a butt portion. Boneless hams will have all bones removed. Bone-in hams are more flavorful and more attractive.
- Formed hams - made from individual cuts of meat and cooked in water. They can be smoked or not.
Adapted from Code of Federal Regulations § 319.104
Country Ham, Country Style Ham, or Dry Cured Ham, and Country Pork Shoulder, Country Style Pork Shoulder, or Dry Cured Pork Shoulder:
The uncooked, cured, dried, smoked, or unsmoked meat food products made respectively from a single piece of meat conforming to the definition of “ham,” or from a single piece of meat from a pork shoulder. They are prepared by the dry application of salt or by salt and one or more optional ingredients: nutritive sweeteners, spices, seasonings, flavorings, sodium or potassium nitrate, and sodium or potassium nitrite. They may not be injected with curing solutions nor placed in curing solutions. The product must be treated for the destruction of possible live trichinae.
| Product description | Protein in % | Water in % |
|---|---|---|
| Ham (Dry Cured) | 20.5 | 0 |
| Ham with Natural Juices | 18.5 | less than 8 |
| Ham-Water Added | 17 | 12-15 |
| Ham & Water Products | 15 | more than 15 |
Looking at the official ham classification, it is clear that except country-style hams (dry hams) all hams contain added water. A typical consumer judges ham not by its flavor (he can’t taste it) but by its color and its presentation. If it looks pretty and carries a good price, it is a good ham... He is buying with his eyes. The consumer does not even realize that he is buying water. Every doctor agrees that drinking clean water is healthy, but spending big bucks for water inside meat is rather outrageous.
Ham Manufacturing Process - General Guidelines
- Meat preparation - cutting and trimming the ham.
- Curing/salting.
- Equalizing.
- Rinsing and soaking.
- Drying.
- Stuffing/Netting.
- Smoking.
- Cooking.
- Cooling.
Curing is the most important step that will affect the quality of the finished product. In the case of dry hams, it also provides safety against spoilage. Hams are always cured, and the procedure is different for a hobbyist and for a commercial plant. A home-based sausage maker can employ time-proven curing techniques such as pickle, salting, salting and pickle, needle injecting and pickle, or needle injecting and salting wherein a commercial producer will inevitably choose needle stitching and tumbling. A hobbyist can produce ham without chemicals, the meat plant cannot afford such a luxury. A hobbyist is chiefly concerned with the quality, the meat plant must be cost-effective in a highly competitive field. Individuals at home do not have to pump extra water into meat, the meat plant is always concerned with the highest gain.
| Curing Method | Description |
|---|---|
| Dry | No water is used. The curing mixture is rubbed in and the meat is left to cure. This is the method for making dry hams. |
| Immersion - cover pickle | Meat is placed in a curing solution and left to cure. Traditional method. |
| Injection | The combination of the traditional method with modern technology. Meat is injected with pickle and: 1. Meat is placed in a cover pickle or rubbed with salt on the outside. Then it is left to cure. 2. The meat is placed in a tumbler (commercial method). |
Most processed meats are cured today by injecting them with a solution of salt, nitrite, phosphate and ascorbate and then bouncing them around in a tumbler to distribute the curing solution uniformly. There is no mystery about meat curing and successful curing requires:
- A two way cure, which works both from the inside out and from the outside in.
- Sufficient time.
It should be noted that only salt and nitrite perform the actual curing. Sugar is added for flavoring only. Hams and bacon taste great when sugar and sweet flavorings are added to the recipe. Brown sugar is more flavorful than cane sugar. Regardless of the curing method employed, the curing principles remain the same, but the length of time a ham is cured will influence the final flavor most.
The salt travels towards the inside, but the moisture evaporates towards the surface. The fat creates a barrier for both processes. This principle applies to all cured products, whether immersed in brine or dry cured.
In a whole ham the individual muscles and intramuscular fat are left alone. Sufficient time must be allowed for curing as not all parts will cure at the same rate. The intramuscular fat, the skin or any membrane surrounding the muscle, for example the silver skin on a pork loin, will not allow for uniform salt distribution.
A chunk of lean meat covered with salt. The salt will work from the outside drawing the moisture out of the meat. After the initial curing the outside area will contain 5% of salt but there will be only 0.5% of salt inside. The inside will contain more moisture as well. The solution is to continue curing without applying additional salt.
Analytical control of ham curing
Rate of salt penetration in a traditionally cured ham in a brine solution. This drawing shows the uneven distribution of salt in ham. Salt is working its way through the exposed lean meat surface first. The fat under the skin inhibits curing.
This drawing shows a fully cured ham. The fat has acquired some salt but much less than other parts. The lean surface areas contain most of the salt.
This drawing shows a ham after it was equalized or simply rinsed and soaked. Salt is distributed almost evenly, the fat still contains little salt but the surface area is less salty.
Adapted from Meat Through The Microscope, C.Robert Moulton, Ph.D and W. Lee Lewis, P.hD, Institute of Meat Packing, The University of Chicago.
Equalizing/Resting
After initial curing by a dry or brine method, the meat will contain more salt in its outside area than in the center. To distribute this salt uniformly an equalizing step is employed. A cured piece is rinsed in cold water and any crystallized salt that has formed on the surface is brushed off. If not removed, this salt would create a barrier to any smoking or drying procedure that might follow. Hams that would be cooked can be equalized in cold water. Dry hams would be either hung on hooks or placed on the shelf. The length of the equalizing period depends on the size of the meat. After equalization the hams will be submitted to smoking or cooking.
The following curing procedures provide more even salt distribution during curing:
- Meat pumping, followed by dry curing or wet curing (cover pickle).
- Meat pumping followed by tumbling. Due to the cost of machines, this method is reserved for commercial applications.
The cure, either in dry or pickle form, is absorbed by the meat and penetrates from outside, mixing with the pickle which was previously distributed inside by stitch pumping. This combination provides faster and more uniform cure distribution and prevents over-curing from the outside.
Traditional Ham Production
Originally there were two methods of curing:
- Dry curing - explained in Dry Hams.
- Wet curing (cover pickle).
Cover pickle hams. A ham was immersed in a solution of water, salt, nitrite, sometimes sugar was added, and left to cure. Depending on the size of a ham, the process could take from 4 to 6 weeks. As salt was slowly diffusing towards the center of the ham, there was a danger that in a large ham the bone area would start spoiling from within before the curing solution would make it through. That problem was known as bone sour and was well understood. Bone areas contain a lot of connective tissue and blood vessels and offer favorable conditions for bacteria to grow. Depending on the shape of the ham, the leg is cut at the pelvis (aitch) and knuckle joint. This creates exposed areas that invite bacteria to follow. As the bone is located deep inside some time was required for the salt to reach it. At the beginning of the process, the bone area contained no salt and offered little protection against spoilage bacteria. To compensate for that a method called “packing” was invented. Using a sterilized narrow knife or pointed stick, a number of insertions were made at the bone joints. Those openings were “packed” with a strong mixture of salt and saltpeter (nitrate).
Immersion curing is a fine method that offers even distribution of curing solution and as a result, very uniform and strong color. The only problem is that it is a slow method, and in order to get the bone area safely cured, we often ended up with a product that was over-salted. This method is greatly improved upon by injecting some of the brine directly into the meat. This is accomplished by a manually operated pump, that looks like a syringe with a very long needle with holes around it. Using the pump a strong curing solution can be injected right into the bone areas and into the muscle. The needle is fully inserted into the meat, and as it is slowly pulled out, the plunger is depressed injecting solution into the meat. There are many advantages to meat pumping:
- Curing times are greatly reduced.
- Solution can be precisely injected into any area, for example near the bone and the bone sour problem is eliminated.
- Spices and flavoring ingredients can be added to the solution.
- There is no need to wait for the salt to migrate into the meat.
- Easy calculations of nitrite and other ingredients.
- Using meat tumblers it is possible to complete the entire curing process without submerging hams in brine.
After hams are injected with cure solution, they are usually immersed in the cover brine of similar or greater strength. This way the penetration of salt and curing ingredients will proceed to the inside as well as from the outside of the ham.

Shoulder bone structure and direction of needle injection.
Ham bone structure and direction of needle injection.
Pump the ham or shoulder along the bones. Fill the pump fully to prevent air pockets. It is strongly recommended to pack some of the dry cure around the shank and hock bones. If curing is performed at higher than refrigerator temperatures, remove sugar from the brine that will be injected into the bone areas. It may start fermentation and ruin the product. There is a variety of meat pumps for general cooking which are available in major department stores. Distributors of sausage-making equipment and supplies carry stainless steel pumps, usually 4 oz capacity with a selection of different needles.
Injection Methods
- Artery
- Stitch
Injection methods flow chart.
The majority of today’s hams are made by one of the above methods, most often by stitch pumping followed by cover pickle. A commercial producer may pump the meat and proceed directly to tumbling. There is not one universal brine nor the time of curing that can be applied to a product. As a rule, the more salt added to the pickle, the stronger brine will be made and the longer the shelf life of a product will be obtained. Different amounts of brine can be injected, and products of different quality will be produced. The more water added, the more diluted flavor is obtained, and a cheaper product is produced. Products of this nature are used for making sandwiches and their weak flavor is masked by extra toppings such as lettuce, tomato, or mayonnaise.
Making Brine (Cover Pickle)
There are thousands of recipes, and they all call for different amounts of brine: gallons, liters, cups, ounces, etc. To compound the matter further, they ask for salt to be measured in pounds, cups, grams, spoons, and teaspoons. To make matters even worse, they ask for table salt, Diamond Kosher Salt, Morton Kosher Salt, canning salt, etc. This creates uncertainty and the poor hobbyist blindly follows an unknown recipe not having the slightest idea what he is doing.
Then, if someone brings him 10 pounds of pork loins and asks him to prepare a brine, he will be lost because he has no recipe for such an amount of meat. To avoid such a pitfall, we cover the subject in more detail, so that you will fully understand meat curing and you will be able to compose your own brine solutions.
Sugar. Sugar is normally added at 1-2% in relation to the weight of the cover pickle. Sugar plays a small role in curing. It offsets the harshness of salt and combines with oxygen easily which helps to preserve the red color of meat.
Other ingredients. Cover pickle is not a marinade, and it needs only water, salt, nitrite, and occasionally sugar. You can add other ingredients such as garlic, pepper, and bay leaf, although many experts frown at such procedures, saying that it only distorts the ham’s natural flavor.
How Much Brine
You have to cover the meats, and a lot of brine will be wasted if you cure 1 chicken in a 55-gallon drum. A basic rule of thumb dictates that the amount of brine should come to about 40-50% in relation to the weight of the meat. For 1.0 lb of meat use 0.4-0.5 lb of brine. Try to use a container whose size and shape will accommodate the meat piece snugly in order to use as little brine as possible.
Many professionals use the following weight ratio: from 30% to 40% of water to 100% of meat. That means that for 1 kg (2.2 lbs) of meat, we add 0.4 liters (400 mg) of water. Then, you choose the strength of the brine and keep on adding salt checking the reading with a salinometer. Let’s say you want to cure two pork butts that weigh 10 pounds in total. A typical figure is to use 40% of water in relation to the weight of meat.
Example:
Green weight: 10 lbs
0.40 x 10 = 4 lbs of water (1/2 gal). (1 gal of water weighs 8.33 lbs).
Answer: Four pounds of brine will be the right amount.
These are rough estimates for orientation purposes only. What must be noted is that meat must be fully covered with brine so make just as much as is needed. Using more brine than necessary facilitates the diffusion of protein and meat juices from meat into the solution. The loss will occur anyhow but will usually stay at about 0.5% only.
Adding Ingredients
When adding ingredients to brine, the basic rule is to add ingredients that readily dissolve in water (phosphates, salt, sugar) first and then those that disperse (starch, carrageenan).
- Add phosphates to water and dissolve.
- Add sugar and soy proteins and dissolve.
- Add salt and dissolve.
- Add sodium nitrite and dissolve.
- Add cure accelerator (sodium erythorbate) and dissolve.
- Add starch and carrageenan.
Basic brine consisting of water, salt, sugar and nitrite may be prepared a day earlier and kept in a refrigerator. If there is any surface foam or bottom sediment it should be filtered. Chlorine in water impedes the action of nitrites so stay away from heavily chlorinated water. Ascorbic acid should not be added into brine containing nitrite as the two chemicals will react, producing fumes. Liquid smoke may be added to brine at 0.1-0.5 g/kg but it is safer to stay on the low side as liquid smoke may impart an overpowering flavor.
Reusing brine is a bad idea as it may contain bacteria from the previous operation. Salt and cure mixes are inexpensive, so it makes no sense to take the risk of meat contamination. A meat plant employs qualified technicians who can run lab tests on brine in order to save costs, but it makes little sense to take the risk at home. At the first suspicion of brine spoilage, it should be replaced with a fresh one, in most cases, there is nothing wrong with the meat itself. The accumulating foam on top of the brine should be periodically removed. In case the foam starts to give a foul odor, turn blue in color, or become a slime, what is known as “ropy” brine, we must remove the ham, wash it in cool water, and place it in a freshly made brine.
Strength of the Brine and Curing Times
There is no universal brine, and its strength will be up to you. A brine tester is a must and a notebook for future reference will be of invaluable help. You can use a stronger brine, and your curing time will be shorter, or you can use a milder brine, and the curing time can be longer. If you add sugar to your brine, it will be heavier. For example, if we add 8 lbs of salt to 5 gallons of water, we obtain 61° brine but if we add 8 lbs of salt plus 3 lbs of sugar to 5 gallons of water, we get 75° brine.
| Salometer Degrees | % of Salt by Weight | Pounds of Salt per Gallon of Water |
|---|---|---|
| 0 | 0.000 | 0.000 |
| 10 | 2.640 | 0.226 |
| 20 | 5.279 | 0.464 |
| 30 | 7.919 | 0.716 |
| 40 | 10.588 | 0.983 |
| 50 | 13.198 | 1.266 |
| 55 | 14.517 | 1.414 |
| 60 | 15.837 | 1.567 |
| 65 | 17.157 | 1.725 |
| 70 | 18.477 | 1.887 |
| 75 | 19.796 | 2.056 |
| 80 | 21.116 | 2.229 |
| 90 | 23.756 | 2.595 |
| 100 | 26.395 | 2.986 |
The table shows that in order to create 60º SAL brine, we have to add 1.567 lb of salt to 1 gallon of water.
Curing method used, curing times and brine strength all depend on each other:
- The strength of the brine – the stronger the brine, the faster the curing.
- The size of the cured meat – a whole turkey requires more brining time than a shrimp.
- The method used – pumping and brining or just brining. Pumping meat shortens curing time.
Make sure you don’t brine meats that have already been brined, such as supermarket stocked pork, which has been treated with sodium phosphate and water to make it juicier. The following brine strengths are for orientation purposes only and feel free to improvise your own solutions. Most meats like 70-75° brine, poultry likes a weaker solution of 21° and most fish are cured at 80° brine.
Fish is cured for 1-2 hours only. Of course, there are small-diameter meat cuts and large ones, chicken breasts, whole chickens, turkeys, fish fillets, small fish, big fish, and all these different meats and cuts will have different curing times. Products such as loins, hams, poultry, and spareribs taste good when some sugar is applied. Sugar is not a curing agent, and it has very little effect on the curing process. Think of sugar in terms of flavoring.
| Meat | Brine Strength in Degrees | Time of Curing |
|---|---|---|
| Poultry | 21 | overnight |
| Bacon | 50 - 65 | 1½ - 2 days per pound |
| Spareribs | 50 - 55 | 1 week |
| Loins | 55 - 65 | 2 weeks |
| Ham, shoulders | 65 - 75 | 4 days per pound |
| Fish | 80 | 2 hours |
If meat were stitch pumped with pickle first, these times would be shortened in half. Notice that sugar, though often added to brine after it is made, does not participate in the calculation for making a brine of a particular strength. That is due to the following reasons:
- A lot of brines do not call for sugar at all.
- A lot of brines call for different amounts of sugar (more sugar for bacon, less sugar for ham).
- People use different sugars, dextrose, maple syrup, or honey.
How Long to Brine
Brine curing is slower than dry curing as you can add only about 26% of salt to the water before the solution becomes saturated (100° SAL). Adding more salt will only cause it to settle down on the bottom of the container. On the other hand, a dry mix consists of 100% salt, although it may contain some sugar and other ingredients in small quantities. For this reason, dry salting is the fastest curing method as the more salt in a curing solution, the faster the curing process. The disadvantage of dry curing is that the drawn-out moisture is not replaced, so the yield of the dry-cured products is smaller. Curing time estimates for the traditional wet cure method (brine strength 50–65 degrees) are as follows:
- 11 days per inch of thickness of the meat.
- About 3 ½ to 4 days per pound for 20 lbs. hams and picnics.
- 3 days per pound for smaller cuts.
Those curing times were practiced in the past when preservation was the main concern. In today’s era, these times may be shortened by 1 day per pound, i.e., a 15-pound ham will be cured for 45 days. Curing times may be further reduced if brine curing is preceded by stitch pumping.
Adding Nitrite
Making brine is very simple but calculating nitrites (Cure #1) is a bit harder. It is a straightforward procedure in the dry curing method used for comminuted products like sausages. We add the needed amount into the sausage mix, stuff the mix into casings and the amount of cure and other ingredients like salt is fully accounted for. Now imagine adding Cure #1 into a solution of salt and water and then placing meat in it. The meat might be immersed 4, 5, 7, or 30 days in a brine, then the meat is removed but the brine remains. How much nitrite and salt diffused into the meat and how much has remained in a leftover brine is anybody’s guess. There are only two ways to be sure:
Weigh the meat before and after curing. This operation is time-consuming and will have to be performed on each individual piece. Although the underlying theory is sound, I don’t believe that anybody is doing that.
Pump the predetermined amount of solution inside of the meat, and then don’t immerse meat into the leftover solution. Meats are usually placed in a tumbler to uniformly distribute the solution. To better estimate the amount of ingoing nitrite, the USDA recommends the following method for calculating nitrite in the cover pickle when curing hams, shoulders, bellies, etc., because it takes weeks for these large items to reach equilibrium. The method assumes that the meat or poultry does not absorb more than the level of nitrite in the cover pickle. Hence, the calculation for nitrite is based on the green weight of the meat or poultry (as is the case with pumped products), but uses percent pick-up as the percent pump. The percent pick-up is the total amount of cover pickle absorbed by the meat or poultry. It is used in the calculation for immersion-cured products in the same way the percent pump is used in calculations for pumped products. It sounds nice in theory but it still depends on the % pick-up of the cured meat.
Does anybody know what would be the % pick-up of a 5 lb pork butt immersed for 10 days in 60° SAL brine? This forces us to use logic and some general estimates that will produce acceptable results. This is better than copying recipes from the Internet, which, in many cases are solely based on an author’s imagination.
Calculation Formula (using % pick-up)
ppm = lb. nitrite x % pick-up x 1,000,000/lb. pickle
Without weighing the meat, the only way to determine % pick-up of cured meat is by an educated guess based on previous experience. It is generally accepted that immersion-cured hams (60° SAL) pick-up about 4% weight. If we add 4.2 ounces (120 g) of Cure #1 to 1 gallon of brine, the solution will contain 1973 ppm of sodium nitrite. At first sight, it may seem that there is an excessive amount of nitrite in water. The answer is that only a small percentage will be absorbed by meat during the immersion process. At 4% pick-up, the ham will absorb 79 ppm which will be just enough for any meaningful curing. At 10% pump (needle pumping) the same ham will contain 197 ppm of sodium nitrite which is in compliance with the government standard of 200 ppm. Pumping more than 10% or increasing the amount of cure in the solution will, of course, cross the limit.
Based on those findings we can come up with the general formula for 60º SAL brine:
| water | 1 gal. (8.33lbs.) | 3.80 kg |
| salt | 1.32 lbs. | 600 g |
| Cure #1 | 4.2 oz. | 120 g |
| sugar | 1.5 oz. | 42 g |
If you need stronger or weaker brine change the amount of salt according to the salt tables. The amount of Cure #1 should remain the same. To eliminate the danger of uneven coloring, manufacturers add sodium erythorbate into the solution. This speeds up the nitrite reaction and more nitric oxide will be released. Nitric oxide will, in turn, react with the meat’s myoglobin and the pink color will be created. By now, you should be fully aware that there isn’t one universal brine and many solutions will do the job. Meat placed in a weaker solution will do as good a job as meat placed in a stronger solution as long as a proper curing time is allowed.
Meat Pumping
Meat pumping is the only method that allows for precise control of salt and nitrite distribution inside meat. A commonly used percentage of injection is 10%. Although after curing the meat may weigh 110% in relation to its original weight, some of the pickle will be lost during smoking and cooking. You can easily increase the gain of your product by adding a phosphate blend which is available from many distributors. This will allow you to pump more water which will be retained by the meat even during cooking. If you pump meat with a solution that contains 2000 ppm of nitrite, but you inject only 10% of the solution in relation to the meat’s weight, the meat absorbs only 200 ppm of sodium nitrite. This is a true figure as long as the meat is not placed in a curing solution anymore. Such pumped meat is usually placed in a meat tumbler and no more solution is added.
The percent pick-up or the percent pump is the total amount of cover pickle absorbed by the meat or poultry.
- Example:
- 10 Percent injection.
- Green weight (initial weight) = 5 kg (11 lbs).
- Percent injection = 10%
- 0.10 x 11 lbs = 1.1 lb
- Pounds of pickle to inject = 1.1 lbs.
- The weight of injected ham:
- 11 + 1.1 = 12.1 lbs.
- Formula for % pump is the same as the formula for % pick-up listed above.
- ppm = lb nitrite x % pump x 1,000,000/lb. pickle
Pumping meat at 10% pump with the general brine formula (4.2 oz Cure #1) results in 197 ppm of sodium nitrite which is in compliance with the government limit of 200 ppm.
General guidelines for making brine:
- Choose the brine strength for your application.
- Add Cure #1.
- Add salt and check the brine strength with a brine tester.
- Add other ingredients that you might like. Adding sugar and other ingredients increases the strength of the brine.
- Remember to account for the extra salt (93.75%) that Cure #1 contains. That is why it is a good practice to add it together with salt.
You can immerse meat in this brine for pickle curing or you can use it for needle pumping. Let’s assume you choose a 10% pump. That means that your meat weighs 10 times more than the amount of brine that will be injected into it. For example, if you took 8.33 pounds (1 gal) of the brine and injected it into 83.3 pounds of meat, the total weight of your injected meat is 83.3 + 8.33 = 91.60 pounds.
To shorten the curing time in half, the meat is pumped with a 10% pump and then immersed in the same solution. At home a good practice will be to pump meat with 7% pump and then immerse it in the remaining curing solution. At the end of curing the ham should gain about 7% in weight.
To calculate the strength of the brine using the floating egg or potato method makes very little sense as the readings are not reliable. There are books that advocate this method, and each gives different readings. The egg sinks in clean water , and as the salt is added it should start lifting to the surface. Well, they do but in a very unpredictable manner. We have checked the floating egg method using five different sizes of fresh eggs and the results were inconclusive.
All that information may look at first a bit confusing but remember that as long as you cure meat at refrigerator temperature, everything will be fine. The meat will be cured if your solution is 70, 60 or 50° SAL strong, but the curing times will be different. As the majority of hams are cooked to a safe temperature, there is not much to worry about. Dry-cured hams are not cooked and require stricter procedures and more attention. Having said that, be flexible and not afraid to experiment, and keep notes for future reference. A home processor can use a manual syringe to inject brine into the meat, but I don’t believe anybody wants to keep a tumbler machine in the kitchen. You could massage the meat with your hands or pound it through a towel with a rubber mallet. Unfortunately, that will require a lot of time, and at temperatures prevailing in an ordinary kitchen that will create more harm than good. After losing moisture during smoking and cooking, commercially produced hams still weigh the same as their original weight. This miracle is due to the water that is injected into the meat and held there by phosphates.
Rinsing and Drying
After the meat is taken from dry cure or brine, it must be rinsed and washed in cold water. A good idea is to soak meat for 2 hours under running water. Smaller pieces may be soaked for 30 minutes only. If a soaking container is used, water should be changed every 30 minutes. Soaking removes some of the salt which is concentrated in the outside area. After that, the ham is hung for 12-24 hours to dry.
Stuffing/Netting
In the past products were laced with butcher’s twine, but today, it is accomplished with netting that comes in an assortment of different sizes, patterns, and colors. It also helps to hold meat together, after the removal of bones. The netting is the “casings”, and the product has to be somehow stuffed into it. Netting sometimes clings to the surface of the finished cooked product and is hard to remove. To prevent that, the netting should be soaked in a releasing agent first until moist. The simplest remedy is to combine equal parts of liquid smoke and vinegar and soak the netting in it. There is a very ingenious method of doing it which requires a common 3-5 gallon plastic bucket.
Stuffing/Netting Procedure:
- Flip netting around the bucket.
- Pull the netting down on the outside of the bucket until the knot is centered and on top.
- Place the butt end of the ham on top of the knot and let it drop into the bucket.
- Tie the knot on top of the netting and make a hanging loop.
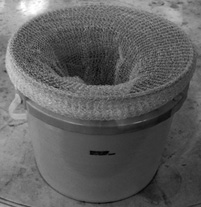
Netting flipped around the bucket.
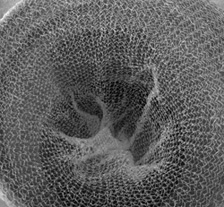
Tied end of the netting inside the bucket.
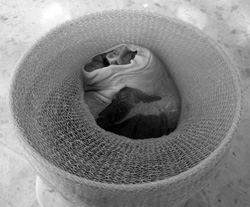
Meat inside netting.

Meat inside netting hanging in smokehouse.
The 5-gallon bucket method works well with bone-in whole hams but for stuffing boneless ham that consists of a few individual muscles, a stuffing horn is usually employed. It is also known as the “roast tyer” and comes in two versions: a cheaper plastic unit and a better stainless-steel model.
Hams, which will be cooked in water, can be stuffed into cook-bags or collagen foil. Then the foil is clipped and thermally treated. This prevents the loss of moisture and meat juices. Such hams are generally not smoked.
Smoking
Except for formed products which are enclosed in a mold and cooked in water, all other meats such as hams, shoulders, loins, bacon, jowls and back fat can be smoked. The time of smoking will depend mainly on the diameter of the product, desired color, and shelf life. After the product has been rinsed or soaked, it has to dry until its surface becomes tacky. This will create proper conditions for smoke deposition. Products that will not be smoked can be submitted to the drying step.
Products like country hams must be cold smoked but the majority of products are smoked with hot smoke and then cooked inside of the smokehouse. It is a good idea to hold products at 110-115° F (44 - 46° C) without applying smoke for 30-60 minutes to dry the surface. The vents should be fully opened to allow for moisture removal. Then the vent is readjusted to 1/4 open position and hot smoke is introduced. It should be noted that in today’s era smoke is applied to flavor meat only, and it can be stopped at any time as long as we continue to cook the product to the FSIS recommended temperature. Generally, hams are hot smoked for between 3 and 5 hours. It is a good idea to keep on raising the smoking temperature as the process continues in order to shorten cooking time.
Cooking
Hams may be:
- Uncooked - hams which were not processed to 137° F (58° C), the temperature that kills Trichinae worm if present in pork. European hams are sliced thin and eaten uncooked. American country hams are often cooked before serving.
- Partially cooked - hams which are cooked to an internal temperature higher than 137° F (58° C) but less than 148° F (64° C).
- Fully cooked - hams which are thermally processed to more than 148° F (64° C), usually to about 154° F (68° C). They are ready to eat at any time.
Many older butchers swear that hams should be first cooked in boiling water for about 10-15 minutes. This will cook the surface area of the ham preventing the loss of meat juices. Then the temperature should be lowered to 80° C (176° F) and remain at that level until the ham is fully cooked. The explanation is that the proteins in the outside area will be immediately cooked which leads to the development of a hardened surface. This, in turn, will prevent meat juices from migrating into water and the finished product will be juicier. The analogy will be grilling a steak when the surface area is seared first at a very high temperature and then the steak is cooked at a lower temperature setting. Meat technologists do not advocate this method and insist that a ham should be cooked at 167-176° F (75-80° C). When ham is removed from hot water its internal temperature will still go up by a few degrees due to the heat transfer from the hot surface. Taking this under consideration, the cooking should be stopped about 2 degrees earlier before the desired internal temperature is obtained.
Cooling
Cooked hams, like all other cooked meats and sausages, are showered with cold water to bring the temperature down. In the case of a large ham, the showering may continue for 30 minutes or longer.