Meats and Sausages
Stuffing Sausages
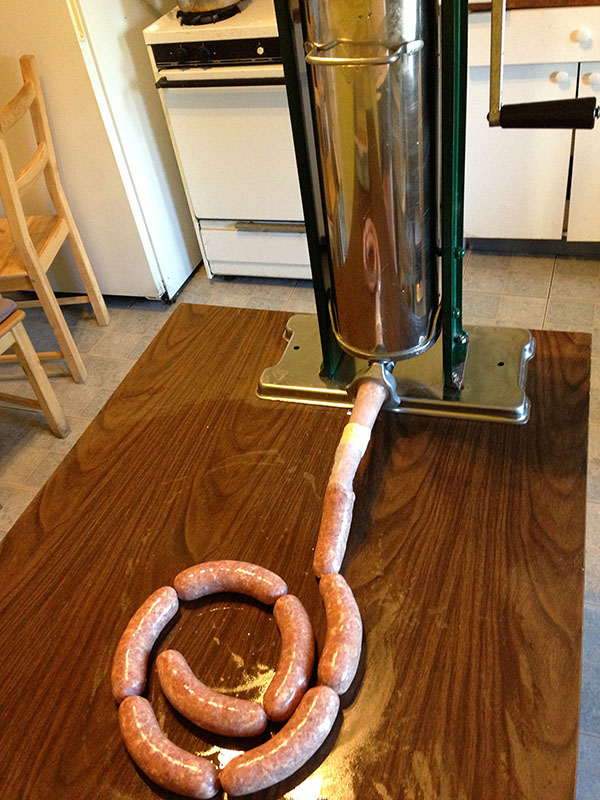
Taste the sausage before it is stuffed, as there is still time for last-minute adjustments. People make mistakes when reading recipes; they get confused with ounces and grams, use different-sized spoons to measure ingredients, etc. Just make a tiny hamburger, throw it in a frying pan, and you can taste your sausage in two minutes. The meat should be stuffed as soon as possible. Allowing the meat to sit overnight causes it to set up since salt absorbs moisture added during mixing. Such sausage masses should be remixed. Stuffing the casings will be much harder the next day. A fresh sausage grilled the next day may be an exception, as the spices will have more time to release flavors. Although sausage should be stuffed as tightly as possible, for practical reasons, different sausage types are stuffed to a different degree of firmness.
Sausages made with filler material such as barley, buckwheat, oats, rice, rusk, or bread crumbs, which is often added to blood sausages, are known to expand during cooking, and they should be stuffed loosely.
The casing should have about a third of a cup of water inside, as it acts as a lubricant for the entering meat. By the same token, pouring water over the stuffing tube increases lubrication. Some people grease the tube lightly. Don’t use water when making slow-fermented salami-type sausages. Use the largest stuffing tube that fits the casing, ensuring it goes on loosely; otherwise, the casing might break.
It is important to stuff sausages without air, as the resulting air pockets might fill with water or develop holes later. Such moisture pockets can become breeding grounds for bacteria when stuffing fermented and dry products. Pack the meat tightly in the grinder, horn, or piston stuffer to prevent air from entering the casing. The air also creates unnecessary resistance during stuffing. Most vertical piston stuffers come equipped with an air valve that allows accumulated air to escape. After the sausage is stuffed, any accumulated air pockets visible to the naked eye are pricked with a needle.
More about linking sausages| Sausage type | Firmness | Remarks |
|---|---|---|
| Rope sausage. | Tight | Meat shrinks in time due to evaporation of the moisture. |
| Individual links, tied with twine or enclosed with clips. | Tight | Meat shrinks in time due to evaporation of the moisture. |
| Rope sausage manually linked into individual links by twisting. | Loosely | If stuffed tight, twisting will be difficult to perform. |
| Liver sausage, Blood sausage, Head cheese. | Loosely | These products are heated in water, and casings may burst open. They often contain filler material such as rice, oats, and barley, which may expand in volume. |
It is a known fact that a smoked sausage will be of higher quality when the meat is seasoned overnight, which is a shorter, simplified version of the curing process that should have been performed earlier. If you want to cure a sausage that way (why not cure it properly?), grind the meat, mix, and stuff it first, then it can be stored overnight in a refrigerator. Note that condensation will likely appear when a cold sausage is transferred from a cooler to a warm room. Sausages that have been kept in the refrigerator overnight should be permitted to hang at room temperature for at least one hour before being placed in the smokehouse.
Recommended stuffing tube diameters
| Tube size | Casing diameter |
|---|---|
| 1/2” | 22-28 mm |
| 3/4” | 30-36 mm |
| 1” | 38 mm and over |
The natural casings are ideal for a home sausage maker, though they require some preparation. After the first session, they become easier to work with and can be ready quickly. Any remaining casings should be packed with salt and stored in a refrigerator. The sausage mass can firm up very fast and should be stuffed without much delay. To remove air, commercial producers perform mixing and stuffing under a vacuum at around 0º C (32º F).
Natural and synthetic casings are used as long as they allow moisture and smoke to go through. They must be able to cling to meat and shrink with it as it goes through the drying process. Natural casings may look solid, but in reality, they contain minute holes (pores) that permit smoke or moisture to go through. If warm fat is ground, it starts to smear and clog up those spores, inhibiting drying.
Natural casings are salted, and they must be prepared for stuffing:
- Desalt casing at least one hour in cold running water before use to eliminate salt and to make them pliable. They can be soaked in cold water for 30 min and then rinsed. Change the water once or twice. Water should be of drinking quality.
- To reduce the possibility of any contamination by bacteria, rinse casings briefly (in and out) with vinegar.
- If the sausage's outside becomes greasy during drying, it should be wiped off with a warm cloth; otherwise, the grease may inhibit drying.
Do not:
- De-salt casings with hot water.
- Store casings at high temperatures.
- De-salt casings for a prolonged period of time.
Steps such as meat cutting, grinding, mixing, and stuffing should be done at temperatures below 12º C (54º F). If working at higher temperatures, try to plan and organize your work in such a way that the meats will be processed as fast as possible and then placed in a refrigerator. All preparatory sausage-making steps, such as cutting, mixing, and stuffing, should be performed at the kitchen's lowest obtainable temperature. If the premises are not temperature controlled, performing those duties in the evening or early morning is advisable.
If a sausage is stuffed into 32, 36 or 38 mm hog casings, its taste will remain unchanged. The smoking and cooking times will change slightly, but the sausage will remain the same. On the other hand, it will be a different sausage if you start experimenting with new spice combinations or add chicken meat to it. The casing is just a packing material, and although some traditionally made products may look unusual if stuffed into casings that we are less familiar with, For example, pepperoni will look odd if stuffed into 24 mm sheep casings, but it will still be pepperoni, and you may as well call it a pepperoni stick. The same applies using synthetic casings; a liver sausage is still going to remain a liver sausage whether it is stuffed into a 36 mm hog casing, 36 mm cellulose casing or 36 mm fibrous casing.

