Meats and Sausages
Barbecue Pit
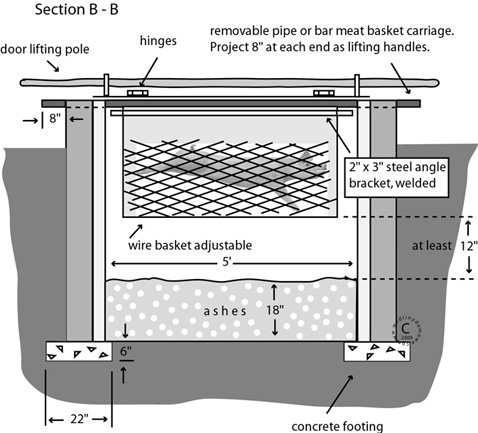
Pit in the ground method is sometimes used for cooking whole pigs. It is not easy and requires a lot of wood and heavy labor. The biggest drawback to this method is that you only get one chance without any room for correction. A hole, about 5 feet deep and about 6" longer and wider than the pig, is made in the ground. A lot of hardwood, at least twice the weight of a pig is burnt to create 18" (45 cm) deep layer of hot coals. Then, a pig is rested at least 12" (30 cm) above hot coals. The pit is covered with a metal sheet, the soil is spread over the metal cover and the pig is left in the ground to cook. If not enough hot coals were made, the pig would be undercooked.
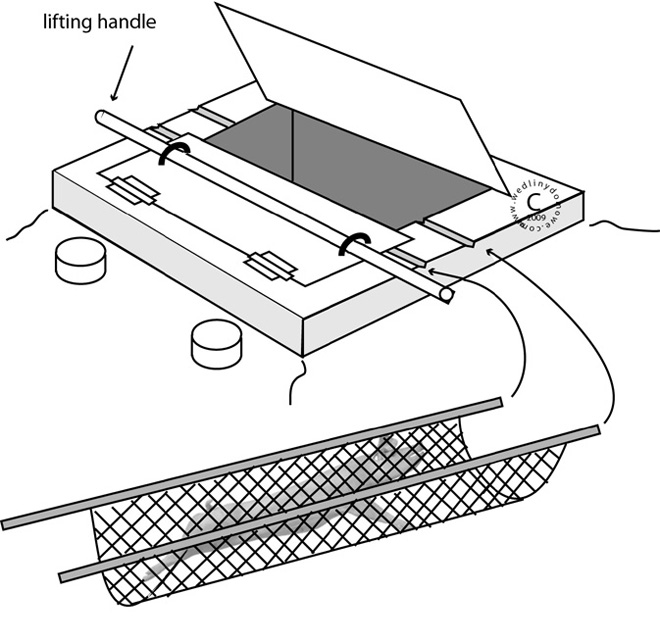
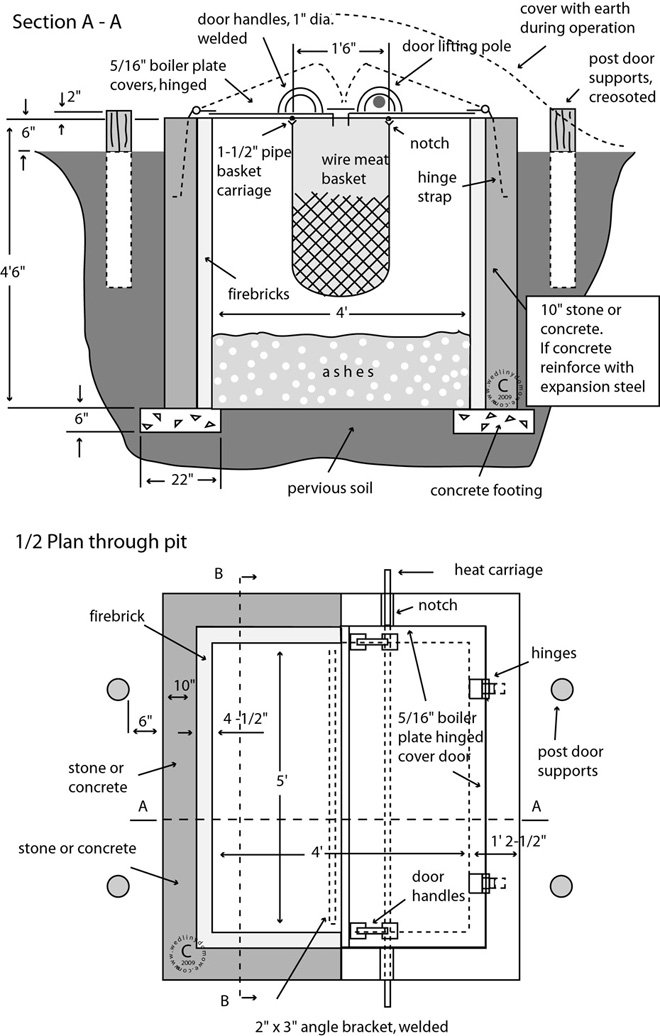
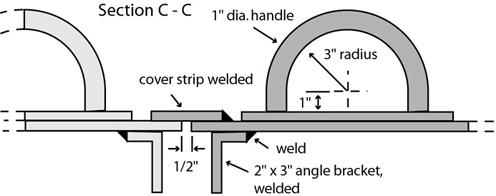
An interesting addition is putting large river gravel stones in a fire and then placing them inside the animal. There is an abundance of tales regarding the pit smoking method but no plans. The only design we have encountered comes from the 1936 book "Camp Stoves And Fireplaces" published by the Forest Service, United Stated Department of Agriculture. The plan has been redrawn by us and follows:
Original plans call for a wire basket, but this design can be modified and a box made of round bars can be used.
Description
This is a very large unit that will easily accommodate a fully grown pig and will provide enough food for a few hundred people. The unit can be scaled down to accommodate the needs of one or two families. The heart of the system is the fire pit which must be lined with firebricks and stone. The idea is to confine heat inside the fire pit and keep it there for as long as possible. This is the same principle that has been employed in massive wood-fired brick ovens for making bread. Or in wood or coal-fired masonry heating ovens that are used in Northern European countries like Sweden, Norway, or Finland.
If we burn a large amount of wood directly in the ground, the heat will warm up the surrounding soil and will dissipate. As a result, the large piece of meat will end up being undercooked. On the other hand, the firebricks and stones will store heat inside and will radiate it back for a long time. This method results in a slow barbecuing process that will go on for a full day without any intervention on our part. After the animal is placed inside, the plates are closed and covered with soil.
Notes
Depending on the pig’s size (around 200 lbs) this may take 16 to 20 hours.
Inside of the pig should be rubbed with a dry mix (salt, pepper, spices).
A pig can be filled with:
- Stuffing.
- Whole chickens (rub pig's inside with a dry mix). Chickens prevent the stomach cavity from sinking in and provide more delicious food for the table.
Decorate the pig with an apple in its mouth and cherries on toothpicks for eyes. Put a block of wood in the pig's mouth during cooking, so it will remain open after cooking for the apple. Sunglasses look lovely, too.
Placing a few aluminum fat collecting pans under the wire basket might be a good idea. It will decrease the possibility of grease fire and will supply fat with meat juices for making gravies or sauces.
If the pig is cooked properly, the meat will pull off of the bones easily.
Don't barbecue freshly killed animals as they have to be aged first. Within 1-2 hours, a freshly slaughtered pig enters the "rigor mortis" stage, which, in simple terms means that the muscles constrict, the meat hardens and becomes stiff. Freshly killed animals should be cooled gradually to about 40º F (4º C) which normally takes about 12-16 hours, and only then placed in a cooler. In pork this period lasts around 8-16 hours, in beef 24-40 hours and only 2-4 hours in chicken. From this point onwards, meat enters the stage of aging/maturing also known as ripening. The muscles relax and meat becomes more tender as it ages. Pork will be tenderized in 2-3 days at a cooler temperature. Beef needs about 2 weeks. This maturing process will be much faster if the temperature is increased but it will adversely affect the meat's shelf life. Meats that are bought from meat distributors or supermarkets have been already aged.
In most cases, the still-warm pig is consumed within hours. Leftovers go into the refrigerator.< /p>

