Meats and Sausages
Vacuum and Exhausting
In canning process vacuum is needed to provide a strong closure. Vacuum is a measure of the extent to which air has been eliminated from the container. The amount of air that is left in the container after filling and the amount of vacuum are closely interrelated.

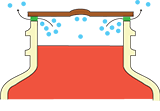
Heat has been applied and the amount of air molecules remains the same. However, the molecules start to move faster and collide with the sides, the lid and each other. They start to exert pressure on the body of the container. As more heat is applied, the air molecules move even faster causing the pressure and temperature to increase.
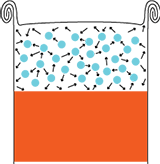
The same container filled with cold food and sealed. As a result more air remains inside and the vacuum is weak. Heat is applied and the air molecules start moving around building up the pressure. The can contains plenty of molecules of air which have no place to go. They start to exert a lot of pressure on the lid and the seams of the can. This may weaken the seam and even deform the can.
A strong vacuum provides the following benefits:
- It reduces stress to the can and its seams during thermal processing.
- It maintains the can ends or jar lids in a concave position giving a visual indication to the conditions of the container.
- It reduces the quantity of oxygen in the container. Fats are not going rancid, the food maintains its quality longer.
In food containers a vacuum is produced by the following methods:
- Thermal exhaust
- Steam displacement
- Mechanical action
Exhausting
Exhausting is allowing air or similar gases to escape from the food. In a sealed container oxygen is undesirable, whether it is released from food cells or is present in the form of entrapped air. Oxygen may react with the food and the interior of the can and affect the quality and nutritive value of the canned food. Other gasses, for example, carbon dioxide, should also be exhausted as much as possible. They may place undue strain on the container during the heat process as they will expand. This will be more of a concern in metal cans, where the gases will be hermetically trapped and have no means to escape.
Thermal Exhaust - This is a typical home production method.
- Cans: contents of the container are heated to 170° F, 77° C, prior to sealing the container. As the contents contract during the cooling step, a vacuum is produced inside.
- Jars: The same effect is produced by filling jars with hot food, and adding boiling water, broth, syrup or brine to the container.
Air bubbles may be trapped inside the jar and will raise to the top during processing, increasing headspace. This may adversely affect the closure of the jar. Run a plastic utensil (knife, spatula) around the jar, moving it up and down, so that any trapped air is released.
In commercial applications exhausting is accomplished by:
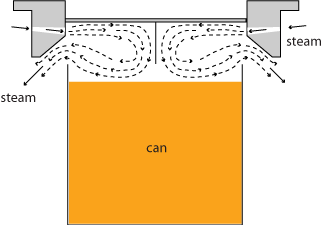
Steam Displacement - Steam is introduced into the headspace where it forces air out. When the container cools down, the steam condenses and a vacuum is produced. Filled with food, open containers are passed through an 'exhaust box' in which steam is used to expand the food by heat and expel air and other gasses.
Obtaining a vacuum by injecting steam into headspace. The steam pushes the air out, then the can is immediately sealed. When the steam condenses, a vacuum is formed.
Mechanical - A commercial method. A portion of the air in the container headspace is removed with a pump. Regardless of the exhausting method used, the container must be immediately sealed while it is still hot.
NOTE After exhausting the metal cans should be processed at once, while still hot. Cans are never sealed cold.


