Meats and Sausages
Meat Curing Methods
There are three methods of curing meats:
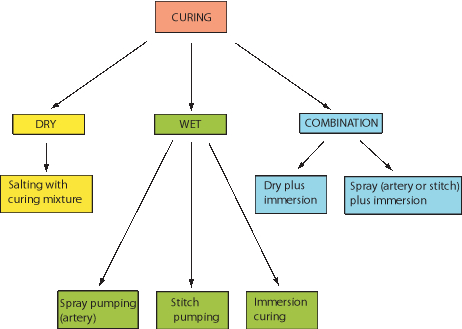
Salt Curing
Salting meat without nitrite is seldom performed today. In some undeveloped countries, the fish is still heavily salted for preservation. Back fat or any fatty trimmings do not contain myoglobin and can not react with nitrite. For this reason, they are salted only.
San Daniele and Parma Italian dry hams are made without nitrate. In all, very few products are made or preserved by salting alone.
When salt is added to meat it provides us with the following benefits:
- Adds flavor (feels pleasant when applied between 2-3%).
- Prevents microbial growth.
- Increases water retention, and meat and fat binding.
Salt does not kill bacteria, it simply prevents or slows down their development. To be effective the salt concentration has to be 10% or higher. Salt concentration of 6% prevents Clostridium botulinum spores from becoming toxins though they may become active when smoking at low temperatures. Adding sodium nitrite (Cure #1) eliminates that danger. The two physical reactions that take place during salting are diffusion and water binding, and no chemical reactions are present. Salting is the fastest method of curing as it rapidly removes water from the inside of the meat. The salt migrates inside of the meat and the water travels to the outside surface of the meat and simply leaks out. This gives us a double benefit:
- Less water in meat
- More salt in meat
Both factors create less favorable conditions for the development of bacteria. Today the products that will be salted only are pork back fat and some hams that will be air-dried for a long time.
,Dry Curing
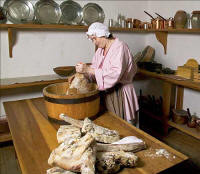
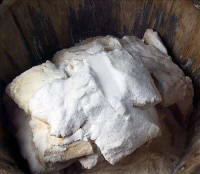
Dry curing has been performed the same way since the 13th century. It is basically the salting method with the addition of nitrates. Before smoking, the salt with nitrates had to be rubbed in ham or other meat cuts, which was a tough job because it could only be done by hand. Then pork pieces were packed in tubs. forcing the meat and coarse salt as tightly as possible and left there for a determined time, sometimes even up up to 6 weeks. The salt was dehydrating the meat and drawing the moisture out of it. All that liquid would simply drain away through the hole in the bottom of the tub. This drainage played an important part in the process as the moisture was taking with it minute meat particles and blood. Those, in turn might spoil the brine if given high enough temperatures. If a brine is kept at refrigerator temperatures. the drainage hole is not needed, and the liquid can sit at the bottom of the vessel. Some of the liquid will be re-absorbed by the meat itself. Of course, if the product is to be air-dried, the liquid is unwelcome as it will slow down the drying process.
The dry curing method is best used for all types of sausages, bacon, and hams that will be air-dried. In most cases, after curing, meats go for smoking, then for air drying and there is no cooking involved. In addition to salt and Nitrates, the ingredients such as sugar, coriander, thyme, and juniper are often added to the dry mix.
The dry cure method is characterized by fast action and can be used under wider temperature variations than other curing methods. There is a greater loss of meat weight due to the loss of water; the product will have a more pronounced flavor, will be saltier and will be better preserved. Suitable for meats that will not be cooked but smoked and air-dried or just air-dried. It is the best curing method for people living in hot climates or having no refrigeration.
Ham production in XVIII Century Virginia. Photos courtesy The Colonial Williamsburg Foundation.
Often, meat was rubbed lightly with salt, but more salt was applied around bones by kneading it harder with thumbs. Then meats were placed on a tilted table to drain from 6 to 12 hours. One pound of salt (1 %) was used for each 100 lbs of meat. Meat treated that way has less chance of spoiling as much of the moisture and leftover blood will drain away. Then, the meat was washed briefly with cold water to remove any traces of the bloody liquid, and a dry mix was applied to its moist surface, which helped to dissolve and hold the cure. The dry cure method is the fastest as it uses nothing but salt (100 %), whereas in wet cure, the maximum salt content is 26 %. At that point, brine becomes saturated, and no more salt can be absorbed by water. Dry cure can be used under wider temperature variations (warmer climate, no refrigeration) and there is less possibility it may go sour. The purpose of air drying is to remove moisture from the meat, and the dry cure, being mostly salt, does not bring any extra moisture into the meat.
The wet cure (water, salt, and nitrite) is a poor choice for the curing of air-dried products as it will provide extra moisture (water) instead of removing it. In most cases, after dry curing, meats go for smoking, then for air drying and there is no cooking involved. In addition to salt and nitrates, ingredients like sugar (not recommended when temperatures are high), coriander, thyme, and juniper are often added to the dry mix. There is some unavoidable loss of natural juices and meat protein when the salting or dry curing method is used (less than 1%). The salted piece will remain in salt for a few weeks or will hang in the air even longer (losing more moisture), and the lost water will not be replaced. The final product will weigh 15-20% less than the weight of the original meat. In the case of byproducts like liver, heart, kidneys, and heart, the weight loss can be as large as 34-40%.
How Dry Curing Works
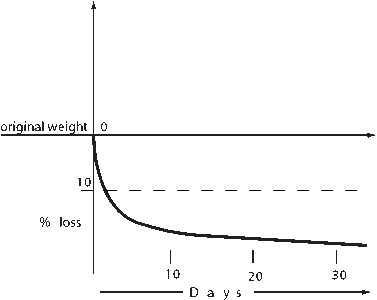
Salt that is rubbed into the surface of the meat starts migrating inside, and at the same time, water that is present inside of the meat starts to travel towards the outside. You may say that the water is leaking out of the meat. This process is very fast during the first 7 days and then slows down as there is more salt inside of the meat and less water. Most dry-cured products will be smoked and/or air-dried, and this is a welcome scenario as a lot of moisture has been eliminated, and there is a smaller possibility of meat spoiling during further air-drying.
Eventually, the equilibrium is reached when all salt is inside of the meat, and no more water loss occurs. Unfortunately, some meat juice (protein, minerals) was lost together with water the meat piece lost some of its original weight. Salt, which is already inside the meat, penetrates meat fibers, and they swell, become larger, and can accept and hold water inside of them. Think of them as if they were a sponge that, when wet can hold quite a lot of water. In most cases, the bloody liquid simply drains away, creating an inevitable weight loss. If the same meat were packed in a sealed tub without drainage holes, some of the natural brine that was created would be absorbed back into the meat. Due to increased salt content, the product may feel salty, which is offset somewhat by adding sugar to the mixture.
Loss of weight (water) during dry curing
How To Apply
To guarantee a continuous supply of salt and uninterrupted curing of the meat, the dry curing is performed in a few stages.
The ingredients should be thoroughly mixed and divided into two equal parts. The first part of the mix should be rubbed into the meat paying extra attention to bone areas which like to spoil first. An extra amount of salt should be supplied there by forcing it with the thumbs. During this initial salting of the meat, it is important to thoroughly cover all surfaces of the meat piece with salt, because the high salt level and the colder temperatures are the only means of protection against the growth of spoilage bacteria.
Then the meats would be packed tightly in a container with larger pieces like hams on the bottom and smaller pieces on the top so that each piece would retain its shape. The meats are packed skin down. Liquid drawn from the meat accumulates on the bottom of the container, and if the holes were made, it would drain off. This liquid can stay in a container providing the curing is done at low temperatures (35-40 F). Most of the liquid will be re-absorbed by the meat itself.
- The remaining part of the mix should be divided into two parts, using each part for the two following saltings. The second cure shall be applied later, exactly like the one earlier, paying special attention to the bones. When repacking, place the pieces in a different order from the one they originally occupied.
- The third cure shall be applied as the second.
For best results, it is recommended to repack meats again on the twenty-first day. The reason the cure is applied in stages is to have a continuous supply of salt and nitrate to continue the process. After curing is complete, the meat pieces must be rinsed in fresh water to remove any crystallized salt that accumulates on the surface, which would prevent successful smoke penetration (some products may not be smoked at all). Then the meats are hung or placed on wire mesh for draining. Store meat at a refrigerator temperature of 38° – 40° F (3° - 4° C).
Basic rules for applying dry cure
When curing times are short, up to 14 days, use Cure #1 according to the standard limit of: 1 oz. cure for 25 lbs. of meat. For longer times, use Cure #2, which contains Nitrate which will keep on releasing nitrite for a long time. The amount of dry mix needed to cure 25 lbs. of meat by the dry cure method when making dry (fermented) sausages is:
- 2 oz. Cure #2
- 12 oz. canning salt
- 6 oz. dextrose or brown sugar
- seasonings
Dry Curing Times
The length of curing depends very much on the size of the meat and its composition. Fatty tissues and skin create a significant barrier to a curing solution. When curing a large meat piece, for example, a ham, a curing solution will start penetrating the lean side of the meat first and then will continue deeper forward towards the bone and the skin side. There will be very little penetration on the fatty skin side. It seems logical that removing the fat layer of the skin will speed up curing. It definitely will, but it is not such a good idea. The fat acts as a barrier not only to curing but to smoking and removal of moisture as well. After smoking, the ham might be baked or poached in hot water. Here the fat acting as a barrier will prevent a loss of dissolved protein and meat juices that will try to migrate into the water. For more uniform curing, meats should be overhauled (re-arranged) on the third and tenth days of the cure. The curing time depends on the size of the meat piece and your preference for a strong or lightly salted product.
A basic rule is 2 days per pound for the small cuts and 3 days per pound for hams and shoulders. For example, a six-pound bacon would require about 12 days to cure, while a 12-pound ham would need 36 days. Another formula calls for 7 days of curing per inch of thickness. A ham weighing 12-14 lbs. and 5 inches thick through the thickest part will be cured 5 x 7 = 35 days. Smaller pieces should end up on top so they can be taken out first, allowing larger pieces to continue curing. Otherwise, they may taste too salty. Smaller meat cuts like bacon, butt, and loins can be cured with a dry mixture based on the following formula for 100 lbs. of meat: 4 lbs. salt, 1.5 lbs. sugar, 2 oz. Saltpeter (1 lb. Cure #2). Divide the mixture into three equal parts. Apply the first one-third and leave the meat to cure. After three days, overhaul and rub in the second part. After three more days, apply the last third of the mixture and allow to cure for about 12 days. Generally, the addition of spices occurs after the last re-salting has been completed.
Rub with ½ cure, overhaul after 1 week, apply ¼ of the mix, overhaul after 2 weeks, apply remaining ¼ mixture.
Wet Curing
,The wet curing method, sometimes called brine (salt and water), sweet pickle (sugar added), or immersion curing, has been traditionally used for larger cuts of meat like butts or hams that were smoked. It is accomplished by placing meats in a wet curing solution (water, salt, nitrites, and sometimes sugar). Sugar is added only when curing at refrigerator temperatures, otherwise it may begin fermentation and start to spoil the meat.
The wet curing is a traditional, time-consuming method, going out of fashion as the large hams had to be submerged for up to 6 weeks and turned over regularly. With such a long curing time, there is a danger of meat spoiling from within the center where the bone is located. During that time we have to scoop up the foam and any slime that might gather on the surface, as that might be a source of contamination. Most smaller meat cuts require about 3-14 days of curing time at 40° F (4° C). It is still a fine curing method for smaller cuts of meat that will have a shorter curing time.
The meats have to be turned over daily and prevented from swimming up to the surface. After curing is complete, the meat pieces must be rinsed in fresh water and placed on wire mesh for draining. We do achieve certain weight gain when curing meats, even without chemicals, but this is not the reason why a home sausage maker cures meats. Meats are cured to produce a top-quality product. The weight gain is as follows:
- Canadian bacon 3-4%
- Bacon 3%
- Ham 4%
Wet curing is slower than dry curing. However, it results in a slight meat weight gain (significant weight gain in commercially made products due to a large amount pumped into meat curing solutions), a product less salty but with shorter shelf life, flavor of the product milder and more palatable. Nowadays more pa opular method of the two.
The wet curing method or immersion curing has been traditionally used for larger cuts of meat like butts or hams that were smoked. It is accomplished by placing meats in a wet curing solution (water, salt, nitrites, sugar). Sugar is added only when curing at refrigerator temperatures, otherwise it will begin fermentation and start spoiling the meat. Wet curing is used to preserve meat, add curing flavor and provide a pink color to the meat. After wet curing, the meats are normally smoked.
Most meat cuts require about 3 – 14 days of curing time at 40° F (4° C). It is still a fine curing method for smaller cuts of meat that will have a shorter curing time. To distribute evenly the curing solution at the half curing time the meats have to be turned over (top pieces placed at the bottom and vice versa) and prevented from swimming up to the surface. The reason is that salt has a tendency to sink to the bottom and nitrates/nitrites like to swim up to the top. The curing solution is not uniform, and has to be agitated once in a while, otherwise meats will not be cured evenly. During that time we have to scoop up the foam and any slime that might gather on the surface, as that might be a source of contamination.
Using this method, large pieces of meat like hams need to remain in solution for up to 6 weeks, and with such a long curing time, there is a danger of meat spoiling from within the center where the bone is located. That is why it is much safer to shorten curing times by applying combination curing (stitch pumping plus wet cure) when curing large pieces of meat.
There are two ways of applying wet cure into meats
- Immersing meat in curing solution (water, salt, and nitrite)
- Spray pumping meats with needles and curing solution
How Wet Curing Works
During wet curing meat products loose some of its water and soluable materials (meat juice, minerals) but are gaining salt. There are basically two distinct phases:
Salt migrates from the solution towards the inside of the meat, and the water from the inside of the meat travels to the solution that is outside. This process is very fast during the first 7 days, then diffusion slows down as the salt pressure becomes equalized on both sides of the meat and finally stops. During this phase, there is a net meat loss due to the loss of water and also some unavoidable loss of natural juices and meat protein, which is much smaller than if a salting or dry curing method were used. This loss of meat juices and protein amounts to about 1% when long-term curing hams.
In the second phase, salt, which is already inside the meat, penetrates meat fibers, and they swell, become larger, and can accept and hold water inside of them. Think of them as if they were a sponge that, when wet can hold quite a lot of water. Now the solution is flowing back into the meat, creating a net gain of weight that depends on the total time of curing, amount of fat, salt concentration, and method of curing. Under normal conditions, this gain happens only after 30 days of curing.
Although the exchange of salt and water stops when salt pressure is balanced on both sides of the meat, nevertheless, the chemical and biological reactions continue inside (nitrate releases nitrite, which reacts with myoglobin and produces a pink color). The cured meat kind of matures (ages) and develops a characteristic curing aroma especially noticeable in the case of cured ham.
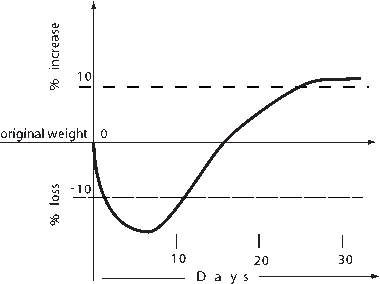
When meat is chopped or ground and then extracted with water, some of the proteins will dissolve. When the meat is left in large pieces, less protein will dissolve. In meat that is covered by fat and skin over the part of its surface (hams), the losses to brine will be reduced. The protein losses depend on the strength of the brine (the stronger the brine, the smaller the losses) and the time of curing and will vary from 1 to 4 percent of the original weight. That happens in brines below 20 percent salt concentration (brines weaker than 75 degrees). These losses are very undesirable as they affect the final flavor of the meat.
Note: All concentrations of brine allow the meat to take up salt. The maximum amount of water was absorbed by the meats when their salt content had reached 4 to 5 percent.
Soaking
The purpose of soaking is to provide uniform salt distribution inside of the meat. A large piece of meat, such as a ham or a picnic (shoulder), even when fully cured, will not have a uniform salt distribution. The reason is that a ham on one side has a layer of fat that lies between the skin and the lean meat underneath. The skin and the accompanying fat layer create a significant barrier to salt penetration so that the curing solution will find it easier to penetrate meat from its face and its leaner side. After curing, there will be more salt near the lean face than near the fat area. The following drawings are based on data from the book “Meat Through The Microscope”, C. Robert Moulton, Ph.D and W. Lee Lewis, Ph.D, The University of Chicago.
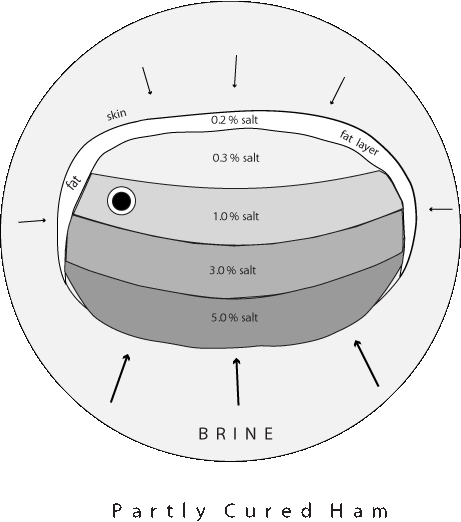
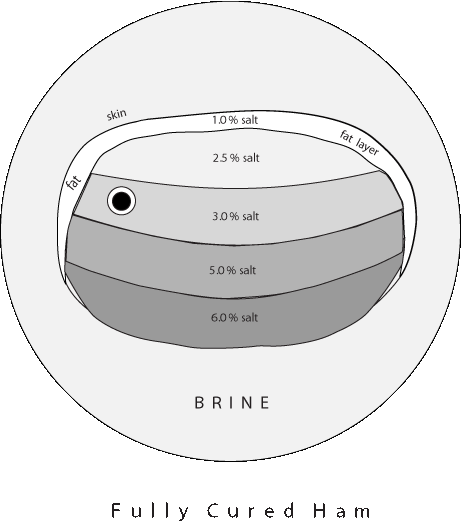
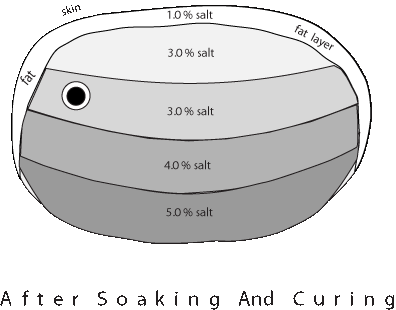
When immersed in cold fresh water, the salt that is present in a ham will start traveling outwards (sort of reverse curing). The outside areas (especially the surface) contain more salt and have the shortest distance to water. Those areas will lose salt first and the salt distribution inside of the meat will be more uniform. Soaking can be performed even on a fully smoked and cooked sausage that was greatly oversalted. Place it in cold water (refrigerator) overnight and you might save your product.
Note When pumping meat with a brine injector we achieve more uniform salt distribution, and soaking can be eliminated. We can directly inject brine under the fat layer to speed up the curing process.
Today, meat preservation plays a secondary role, and for the best-tasting product, it is advisable to soak meats in running water. If not using running water, the container where meats are soaked should have the water replaced every 30 minutes. The reason for soaking is the removal of excess salt that normally accumulates on the surface of the meats and for a more uniform distribution of the salt inside of the meat. The recommended times are: 2 hours for the hams and shoulders and 30 minutes for the bacon. Some sources ask for 3 minutes of soaking for each day of curing. Keep in mind that soaking will remove about 10 % of the curing ingredients that were introduced into the meat. The surface of the meat should be washed with water to remove any crystals which could prevent proper smoke penetration. Then the meats are hung or placed on wire mesh and allowed to drip for 24 hours before smoking. Store meat at a refrigerator temperature of 38° – 40° F (3° - 4° C).
Pumping the meat and then immersing it in a solution allows more even salt distribution inside. The salt distribution inside of the ham will further equalize during the smoking process. If meats are pumped first and immersed in brine or submitted to a massaging process, there is no need for soaking.
Draining
Rinsing/soaking should be done in cold running water 62º – 68º F (17º-20º C). The time depends on the size of the meat pieces and the total time of curing. If, after curing, meats are not soaked, they should be briefly rinsed with warm water 106º – 114º F (43º-45ºC) to remove any salt crystals and then hung in a ventilated area for drying. The surface of the meat must be dry or feel tacky before smoking. Air fan can speed up the drying process, or meat can dry out in a smoker by applying moderate heat. The temperature should not be higher than 120º F (48º C) and all drafts shall be opened as we want the flow of the fresh air. That normally takes about a day.
Meat Pumping
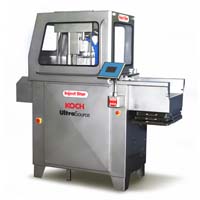
Commercial plants add phosphates to wet cure solution, which can hold significant amounts of water,r which leads to higher profits. Water-retaining chemicals that are used in commercial applications can be very effective; thus, using state-of-the-art pumping machines allows for adding up to 80 % of the curing solution into meat in relation to the original weight. There are high-technology companies that produce especially prepared mixtures that are used for that purpose.
Needle pumping has many advantages:
- Curing solution can be precisely introduced where needed most (bone areas and fatty tissues)
- Curing times become shorter
- Spices and special flavorings can be injected inside of the meat
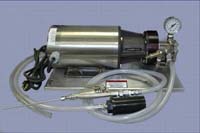
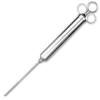
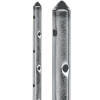
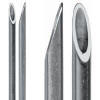
A home sausage maker can use a manual meat syringe to perform the same function though on a somewhat limited scale. The syringe holds 4 oz. of brine and has a 5 3/8” long needle with 12 tiny holes around its surface. Smaller syringes for general kitchen use can be found in every major appliances store. They are used for pumping meats with marinade.
Photographs courtesy The SausageMaker, Buffalo, N.Y.
There are two methods of needle pumping:
- Artery pumping
- A wet cure method where a long needle, connected with a hose to a pump, will inject a brine solution into the ham’s artery. It is a very efficient way of distributing the curing solution uniformly and quickly through the meat. The arterial blood system of the animal becomes a pipeline for the brine distribution throughout the ham. A leg will have to be carefully and professionally butchered so the artery will remain intact. There is, of course, no possibility of bone removal prior to pumping. It was a very popular method during Russia’s engagement in the First World War (1914-1918) and during the Second World War (1941-1945). After the kill, the pigs were immediately artery-pumped. The solution pumped out all blood from the animal then remained in its system. This method requires some anatomy knowledge on the part of the operator but is still too slow for present meat processors and is going out of fashion.
- Stitch pumping
- A wet cure method where the curing solution is applied under pressure to the surface of the ham, bacon, butt, etc., with a bank of needles connected to a pump. The solution comes from the pump, and its pressure is strictly controlled; otherwise; it will create tear and internal damage to the meat fibers. The fact that you have pumped up your meat does not mean it is already cured. It either has to go into a tumbler to be massaged for a day or two or has to be immersed in the remaining solution for the prescribed time. Very often, it was pumped with a stronger solution (75 %) and immersed in a weaker brine (70 %).
A home sausage maker can use a manual meat syringe to perform the same function, though on a somewhat limited scale. The syringe holds 4 oz of brine and has a 5 3/8” long needle with 12 tiny holes around its surface. There is no need to worry about pressure which is constant and low enough not to create any damage to meat fibers. For home sausage makers the main advantage of pumping meat is the ability to direct curing solution around the bones of the ham, which will very effectively prevent bone souring.
Stitch pumping though very effective, do not allow for an even distribution of the brine, and should be followed by either:
- Massaging in tumblers (commercial applications)
- Immersion curing
- Dry curing
How Much To Pump
The amount of solution that will be introduced into the meat depends largely on the total time of curing:
- Fast curing (7-14 days) requires about 10-12% of brine in relation to the original weight of the meat (green weight)
- Slow curing (30-50 days) requires about 5-6% of brine in relation to the original weight of the meat (green weight
Keep in mind that pumping meat introduces moisture into the product, which is undesirable in dry meats or when the main purpose of curing is meat preservation. In these cases dry curing method is more suitable. Hams are generally pumped with a solution of similar or greater strength than the solution that will cover them. That allows injected curing ingredients to work simultaneously on the inside and to penetrate the meat from the outside. The final effect will be more uniform salt distribution and a faster curing time.
How and Where to Pump
Large pieces of meat like hams have a tendency to start spoiling within the bone area, which is known as “bone taint, which can happen after 30 days. Needless to say, higher-than-recommended temperatures will greatly speed up the process. Direct introduction of brine into those areas will allow for immediate curing to take place, thus protecting the meat from spoilage and reducing total curing time. Bone-sour is more common when large pieces of meat, like hams and picnics, are cured in a brine. The salt present in brine takes almost twice as long to penetrate the ham as does salt from the dry cure. For this reason, large cuts of meat should always be pumped with a curing solution and then immersed in brine or rubbed with dry mix on the outside and left for curing. Pumping the meat and applying dry mix on the outside is the fastest curing method.
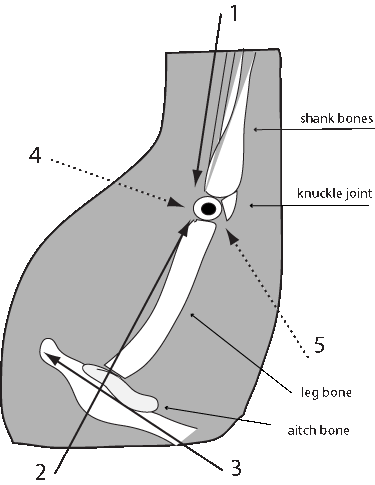
For hams and shoulders that weigh 10 – 15 lbs use 3 pumpfuls of brine (1-shank, 2-knuckle joint and 3-aitch bone). For hams and shoulders that weigh more than 15 lbs use 5 pumpfulls.
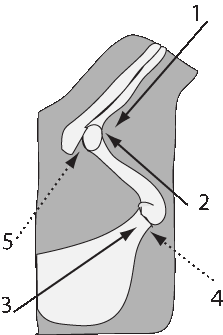
After the meat is pumped with the solution, it is placed in tubs up to 3’ high and weighed down from the top so the pieces will remain completely immersed in brine.
Wet Curing - Spray Pumping Followed by Immersion Curing
Curing solution: salt, water, and nitrates/nitrites
| Product | Brine Strength in SALometer degrees | % (weight) of pumped solution in relation to the original meat weight (100 kg) | Number of injections | Amount of Brine in % relation to the weight of the meat (100 kg) | Curing Time in Days |
|---|---|---|---|---|---|
| Smoked and Boiled Ham | 65 - 85 | 6 – 7 (6-7 kg) | 7 - 9 | 40 | If Artery 6-10 or if Stitch 8-12 |
| Smoked and Boiled Butt | 65 - 85 | 6 - 7 | 5 - 7 | 40 | If Artery 5-8 or if Stitch 6-10 |
| Smoked Canadian Bacon, Smoked Loin | 55 - 65 | 2 - 3 | 2 - 3 | 40 | 5 - 7 |
| Boiled Beef Ham | 65 – 85 (3% sugar added to brine in relation to salt) | 6 – 7 | 2 - 4 | 30 | 8 - 10 |
| Smoked Bacon | 65 – 85 | 5 – 6 | 4 – 5 | 30 | 4 - 6 |
| Smoked Jowls | 65 – 85 | 2 –3 | 4 – 5 | 30 | 4 - 6 |
Overhauling
- Overhauling means periodic re-arrangement of meat pieces that are inside of a curing container. It is done for the following reasons:
- There will be less curing in areas where meats touch each other. Undercured meat areas may have a different shade of pink color.
- The curing solution will have sections of different density-salt will sink to the bottom, nitrate will swim up to the top
- When meats are placed on top of each other, the top layers supply pressure to the bottom section, and the meat juices will leak out into the brine. That is why meats should not be stacked higher than 3 feet.
The strength of the solution will change in time; salt might settle on the bottom, nitrites might be on top, some meat juices will enter the brine, meat pieces may touch each other, etc. To allow all meats to cure evenly, the solution should be remixed and agitated. A rule of thumb is to overhaul the meat every seventh day for three weeks. A smaller piece that will be cured for 10 days only should be overhauled after 5 days. The easiest way is to use two separate containers and switch the meats from one container to the other. The pieces that were on top are now on the bottom, and vice versa. Then the brine can be stirred and poured over meat pieces in a new container. If only one container is used, the meat should be removed, the brine stirred, and the meat reinserted in a different order.
Combination Curing
-
Combining the dry cure method with spray pumping
- A ham is spray-pumped with a curing solution, and the outside is rubbed with dry mix (salt and nitrite). That will allow the inside curing solution to penetrate the meat more evenly while the outside dry mix solution will be moving towards the inside. Combining the wet cure method with spray pumping (artery or stitch)
- A meat cut is spray-pumped with a curing solution and then immersed in a container. The meat pieces should be completely covered and weighed down to prevent pieces from rising to the surface. They must also be turned over at least once every day for the duration of curing. The higher the salt percentage in a curing solution, the faster the curing process. When 26% of salt is added to water, the solution becomes saturated, and more salt will not be absorbed by the water. The salt will settle on the bottom of the container. When forcefully rubbing salt into the meat we are introducing 100% of salt. This means that the dry curing method is much faster as it introduces more salt. Another benefit is that no moisture is added into the meat, on the contrary, salt will draw water out of meat creating less favorable conditions for bacteria to grow. For these reasons, traditionally made hams relied on the dry cure method.
Combination curing is a very popular method as it drastically cuts down processing time. Below there are some typical curing times that employ combination curing. Dry mix (salt and nitrates/nitrites) are rubbed into meat pieces, then placed on top of each other (up to 3’ high) in a container. The additional mix is added between layers, and the meat is left to cure for 24 hours. Then container is filled with a wet curing solution and secured from the top for neat pieces to be completely immersed in brine.
Combination Curing – Dry Method followed by Wet Method
Curing ingredients: salt, nitrates/nitrites and water
| Product | Brine Strength in SALometer degrees | % (weight) of dry mixture in relation to original meat weight (100 kg) | Dry Curing Time in Hours | Amount of Brine in % relation to the weight of the meat (100 kg) | Curing Time in Brine (in Days) | Draining Time in Days |
|---|---|---|---|---|---|---|
| Smoked Loin | 50 - 55 | 2 (2 kg) | 24 - 36 | 30 (30 liters) | 5 - 8 | 1 |
| Smoked Butt | 50 – 55 | 2 – 6 | 24 – 36 | 30 | 6 – 10 | 1 |
| Boiled Butt | 50 – 55 | 2 – 6 | 24 – 36 | 30 | 6 - 10 | 1 |
| Smoked Bacon | 65 – 85 | 3 | 24 – 36 | 40 | 7 – 10 | 1 - 2 |
| Smoked Jowls | 65 – 85 | 3 | 24 – 36 | 40 | 7 – 10 | 1 - 2 |
Commercial Curing Methods
Meat plants can not afford the luxury of traditional wet curing as it requires storage space and extra time. The process they employed consisted of pumping meats with needle injectors with specially formulated and often patented formulas, then massaging the meats in tumblers to distribute the curing solution more evenly. Needle injectors pump the meat under pressure with a prepared solution that contains everything that is allowed by law to make the process the shortest and most economical. Some methods allow pumping meat with a curing solution and microscopic parts of meat of any kind. Massaging is an additional curing step employed by commercial plants. It involves placing pieces of meat that are pumped with curing solution into a meat tumbler. This is a machine with a rotating drum, and the meat pieces will be bouncing around its mowing walls providing even better brine distribution inside of the meat. The meat does not have to be immersed in brine at all. Using high-production stitch pumping machines and a tumbler, a ham can be ready for the smoker in 24 hours. You can massage your meat by hitting it with a closed fist all around, you could even wrapp up meat with a towel and hit it for a few minutes with a heavy object. You could also buy a small-capacity tumbler machine.
Meat plants don’t use these machines to improve quality; they use them to work faster and save money. A pork butt left for 10 days in a brine solution will be perfectly cured in every area, something a needle injector and tumbler will not do. There is a limit to how many holes can be made in meat with needles as they damage the texture of the meat. These machines are only effective if used with chemicals that will help to cure meat faster. By injecting the curing solution directly into the meat, we speed up the process.
The tumbler helps to distribute the solution evenly inside, but nitrite needs time to create a pink color. Salt also needs time to cure meat, but there is no easy way to determine how well salt does its job. If the curing time is too short, some areas of the large piece of meat will turn grey, some lightly pink, and some will be red-pink. That is why we use cure accelerators, so they can cure and color meat at a much faster rate.
Wiltshire Curing
Wiltshire curing was an English method of curing whole hog sides in brine. Curing bacterial flora was carefully maintained in the same tank for many years. This, of course, required laboratory testing. More salt and Nitrate were added when needed, and the bacteria living in the brine kept reacting with Nitrate. The reaction produced nitrite which kept on curing meat. In a freshly formulated brine, there may not be enough bacteria to convert Nitrate into nitrite, and as a result, the curing may be poor. For this reason, the use of Nitrate is generally discouraged today.

