Meats and Sausages
Making Burners
In some countries procuring a burner may be difficult or simply too expensive. A smokehouse could be of a large walk-in size that was used for cold smoking only and now we want to add the heating supply to finish the smoked product by cooking it inside. By cooking it to the recommended internal temperature, we get a ready-to-eat product. Let's assume that somewhere in the mountains, we smoke a lot of meat that we bring back into the city. The inside dimensions of our concrete block smokehouse are 6'8" (long) x 5'4" (wide) x 8' (high), like the one in the photo below:
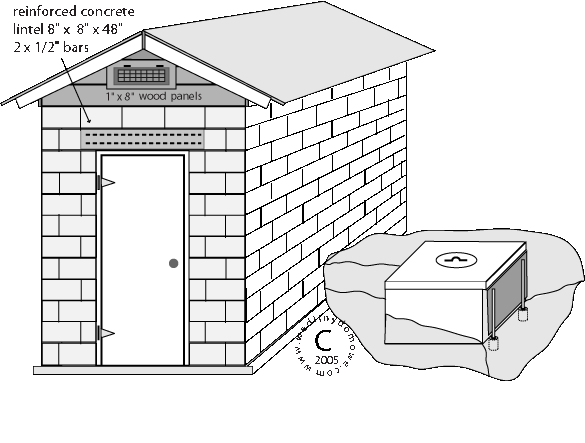
We would like to bake our products inside of the smokehouse but to maintain temperature using only wood in such a large unit will be extremely difficult. There is no electricity or natural gas nearby, so our choice has been narrowed to a liquid propane system.
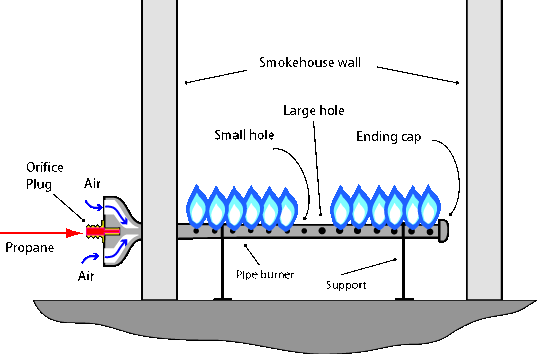
Our installation might look like this:
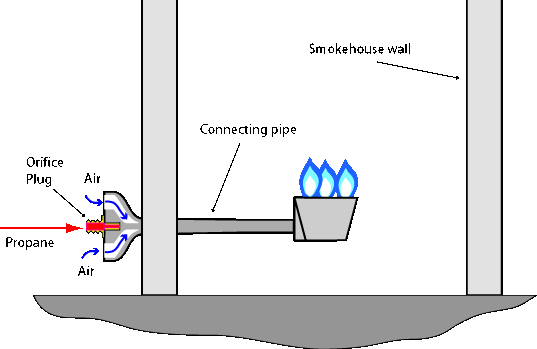
A section of pipe threaded on both ends, connects venturi with a burner. The centrally placed burner will not distribute heat equally in all parts of the large smokehouse unless a metal plate/baffle will be installed above the burner.
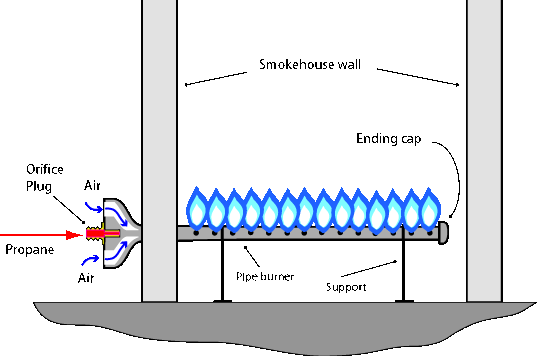
This is a better solution. A section of the steel pipe is threaded into the venturi. The other end is capped. A series of 1/16" holes are drilled on both sides throughout the length of the pipe, which becomes the burner itself. Larger holes may create problems as the pressurized propane may extinguish the flame. This will not happen with natural gas whose pressure is much lower and the holes can be drilled slightly larger.
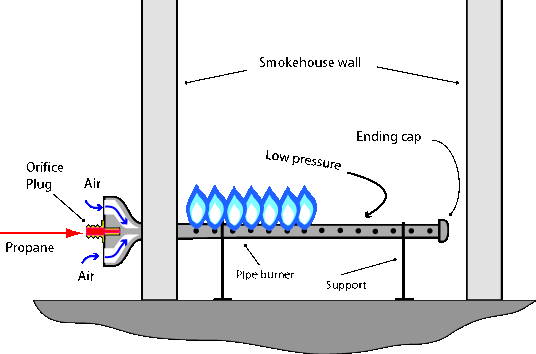
If the regulator is not able to meet the demand, there might be a case where a back section of the pipe burner will lose a flame as there is not enough pressure to sustain the flame. The simplest solution is to drill slightly larger holes in the area of the pipe that is having difficulty. Another solution is to get a stronger regulator.
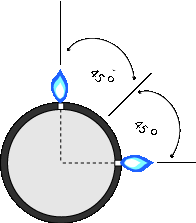
The holes should be drilled at a 45° angle. This is much simpler than it looks - just drill two rows of holes at a 90° angle (drawing below), then turn the pipe 45°.
Pipe burners are tricky…the holes must be precisely drilled, they must be relatively close together, they work best in a very straight line, and if the pipe has any length to it at all there can be a number of different size holes involved if one is to get an even flame from one end to the other. An even flame height from one end to the other is important for even heating. The venturi design, the orifice size, and the air shutter configuration are also critical in order to get the blue flame within a larger blue flame, indicative of complete combustion. Propane and natural gas are simply too expensive to waste. A design for high-pressure propane does not work for low-pressure propane, and certainly not for natural gas.
Note: A burner will not stay lit in a closed setup. The venturi will not supply a sufficient amount of air. There must be a fresh air intake and a chimney for the exhaust gases; otherwise, the carbon dioxide and water vapor will extinguish the flames. You must have a draft through the enclosure.
Tejas Smokers Pipe Burners
The following information and photos come courtesy Tejas Smokers:
" We have found that pipe burners of 1 ¼” internal diameters are the most versatile to work with. For folks attempting to make their own, they will quickly find out that drilling holes into 1 ¼” ID pipe is a lot easier than drilling into ¾” ID pipe. We make ours on a computer-programmed CNC machine and we stock them in 32”, 44”, 56”, and 68” lengths. The OD is 1.5” and the wall thickness of the pipe (not galvanized) is 0.375”.
All pipe burners require an 8” throat where there are no holes drilled. So a 32” pipe burner would have a maximum of 24” of drilled holes.
Generally speaking a pipe burner will heat an area more evenly than does a cast burner. One would like to get all the heat possible out of every bit of the gas used. Folks are getting away from just cutting slits in pipe up and down the length of the pipe just for those reasons. You end up wasting too much gas with yellow flames. Propane and natural gas are expensive. These days no one can afford to not completely combust the gas."
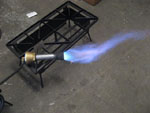
If you follow the advice given here, you will get nice, even, blue flames from end to end, and the burner will self-ignite, i.e., the flames quickly jump from one hole to the next.
Tejas Smokers Burner Heads
HPMAX system by Tejas Smokers
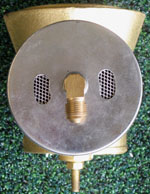
It is composed of a 6” diameter cast iron burner head which has a height of 6 ¼”. This burner head can be attached to the matching venturi, which is called the HPMAX-1, by a 1 ¼” pipe nipple of any length. That pipe nipple, of course, serves as the throat of the burner where the air and gas mix together before ignition. This burner can output 225,000 btu/hr. The weight is 10#, excluding the pipe nipple.
The HPMAX-1 venturi is versatile and can be used whenever one needs a venturi associated with a larger pipe diameter, i.e., a 1 ¼” pipe burner. Pipe burners find use in corn roasters, hog roasters, maple syrup evaporators, griddles, industrial conveyors belts where the products must be kept heated, ceramic kilns, porcelain kilns, bbq grills, smoker pits, and smokehouses.
There is also a smaller venturi, the HPGX-1, which is designed for use with a ¾” ID pipe, however, some applications will require the extra btu/hr capabilities that only a larger 1 ¼”ID pipe diameter can deliver. Both of these venturis were originally designed to be used with high-pressure propane, but both can be modified for use with low-pressure propane or natural gas, with an appropriate change of the orifice diameters and the size of the adjustable air shutters.
A point should be stressed here, that all smokehouse gas burners are subject to burner safety issues.
More on pipe burners
Disclaimer
The information provided on this page on making your own burners and installing your own gas heating systems is for educational purposes only. Gas systems of any kind are very dangerous, and the actual work involved in making or assembling any components or the whole system should be performed by a qualified and licensed plumber or contractor only.

