Meats and Sausages
Evaluation of the Double Seam
The shape and conformation of the finished seam are determined by the design of the seaming rolls and the taper of the chuck. Roll shapes may be changed to accommodate different thicknesses of the can material. The roll shapes, the pressure adjustments of the rolls and the base plate will determine the shape, the dimensions and the integrity of the double seam. At first sight, the shape of the double seam may appear to be satisfactory, however, one or more of the internal structures may be out of limits. As a result, a hermetic seal will not be produced. The commercial sealing machine may close 1000 cans each minute, so a defect, if not recognized soon, may result in thousands of defective closures. To prevent this from happening, a trained mechanic is continuously inspecting the production.
A Visual Inspection of closures shall be performed at sufficient intervals which may discover more obvious defects. The interval between visual inspections cannot exceed 30 minutes of continuous sealing machine operation.
In addition, USDA/FSIS regulations require Double Seam Teardown examinations which shall be performed at intervals of sufficient frequency, not to exceed 4 operating hours.
A sealer designed for home canning operates at lesser capacity, however, an understanding of the double seam inspection procedures will make a hobbyist more knowledgeable. The following drawing depicts crucial dimensions of a completed double seam. They shall be measured with a quality micrometer capable of taking measurements with an accuracy of 1/1000 of inch.
The required seam measurements: cover hook length, body hook length, width (length, height), tightness (observation for wrinkle), thickness.
The optional seam measurements: overlap (by calculation), countersink.
The detailed requirements are listed in 21 CFR, Part 113.60
The question may arise as where to obtain the technical dimension of a properly formed double seam. The can manufacturer has all technical data and his distributors have access to this information.
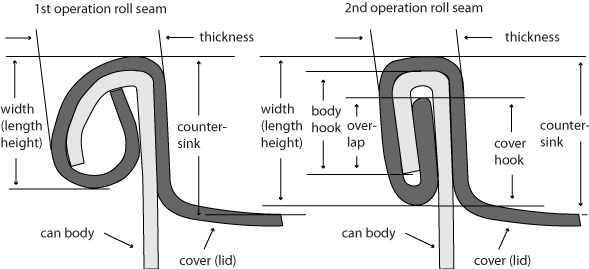
Seam measurements.
Government regulations allow for two different types of the double seam examinations:
1. The micrometer method. The invention of the micrometer is attributed to Jean Laurent Palmer of Paris in 1848 and the micrometer caliper was introduced to the mass market by Brown & Sharpe in 1867, bringing the instrument into the average machine shop.
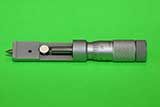
The seam measurements are taken in thousandths of an inch so precision tools are necessary. A standard micrometer with a round anvil may be used, however, the seam micrometer has a stem that has been specifically designed for taking seam measurements.
Closing machines produce strong double seams when properly set up and adjusted. Because there are different manufacturers of sealing machines and metal cans, it is impossible to have one set of specifications that would apply to all machines and all sizes of cans. For that reason, commercial plants obtain specifications and technical support from the representatives of the companies that manufacture the closing machines and the cans. The following seam data is offered in good faith as typical reference and not as specification or requirements: cover and body hooks each are about the same length, and they fall into the range of from 0.076 to 0.084 inches in length. These tolerance ranges are for the cans from 301 to 404 diameters. Countersink depth is around 0.125.
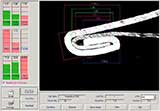
2. The optical method. The seam projector is a computerized accurate machine that not only displays an ex-ray-type image on the monitor, but is also capable of precisely calculating the seam measurements. Because of its cost, it is unlikely that the seam projector will be used in home canning. Commercial plants use computerized seam projectors. Quality By Vision is a global leader in the development and manufacturing of Quality and Process Control systems for the canning industry and its suppliers. Their SEAMetal HD double seam vision system provides an unprecedented look at the double seam. A sharp and clear image is supported by very precise measurements.
The system runs under Windows operating systems (including Vista) and connects to the computer using USB. The software measures: body thickness, cover thickness, seam thickness, seam length (seam height), body hook, cover hook, wrinkle (tightness), seam gap, countersink, body hook butting, cover hook butting, overlap, overlap %, (countersink - length), vee, and many more.
Quoted from the Canadian Food Inspection Agency, Metal Can Defects Manual - Identification and Classification:
"It is extremely important to recognize and understand that the quality of the double seams cannot always be judged on measured dimensions alone. Visual inspection for tightness and visible abnormalities are equally important. Dimensions outside the can maker's guidelines do not necessarily mean that seam integrity is compromised. It means that the seam should be carefully evaluated. Final judgement must be based on the amount of deviation along with all of the other measurements and observations. Can makers supply guidelines to their customers and indicate frequency of tests as well as points of measurement. These can makers' guidelines recognize the need to check certain attributes at certain points on the can. Not all tests need to be performed at every check."
For those who want to study the subject deeper a list of sources with additional information about can seam defects is provided in the Links of Interest section.

